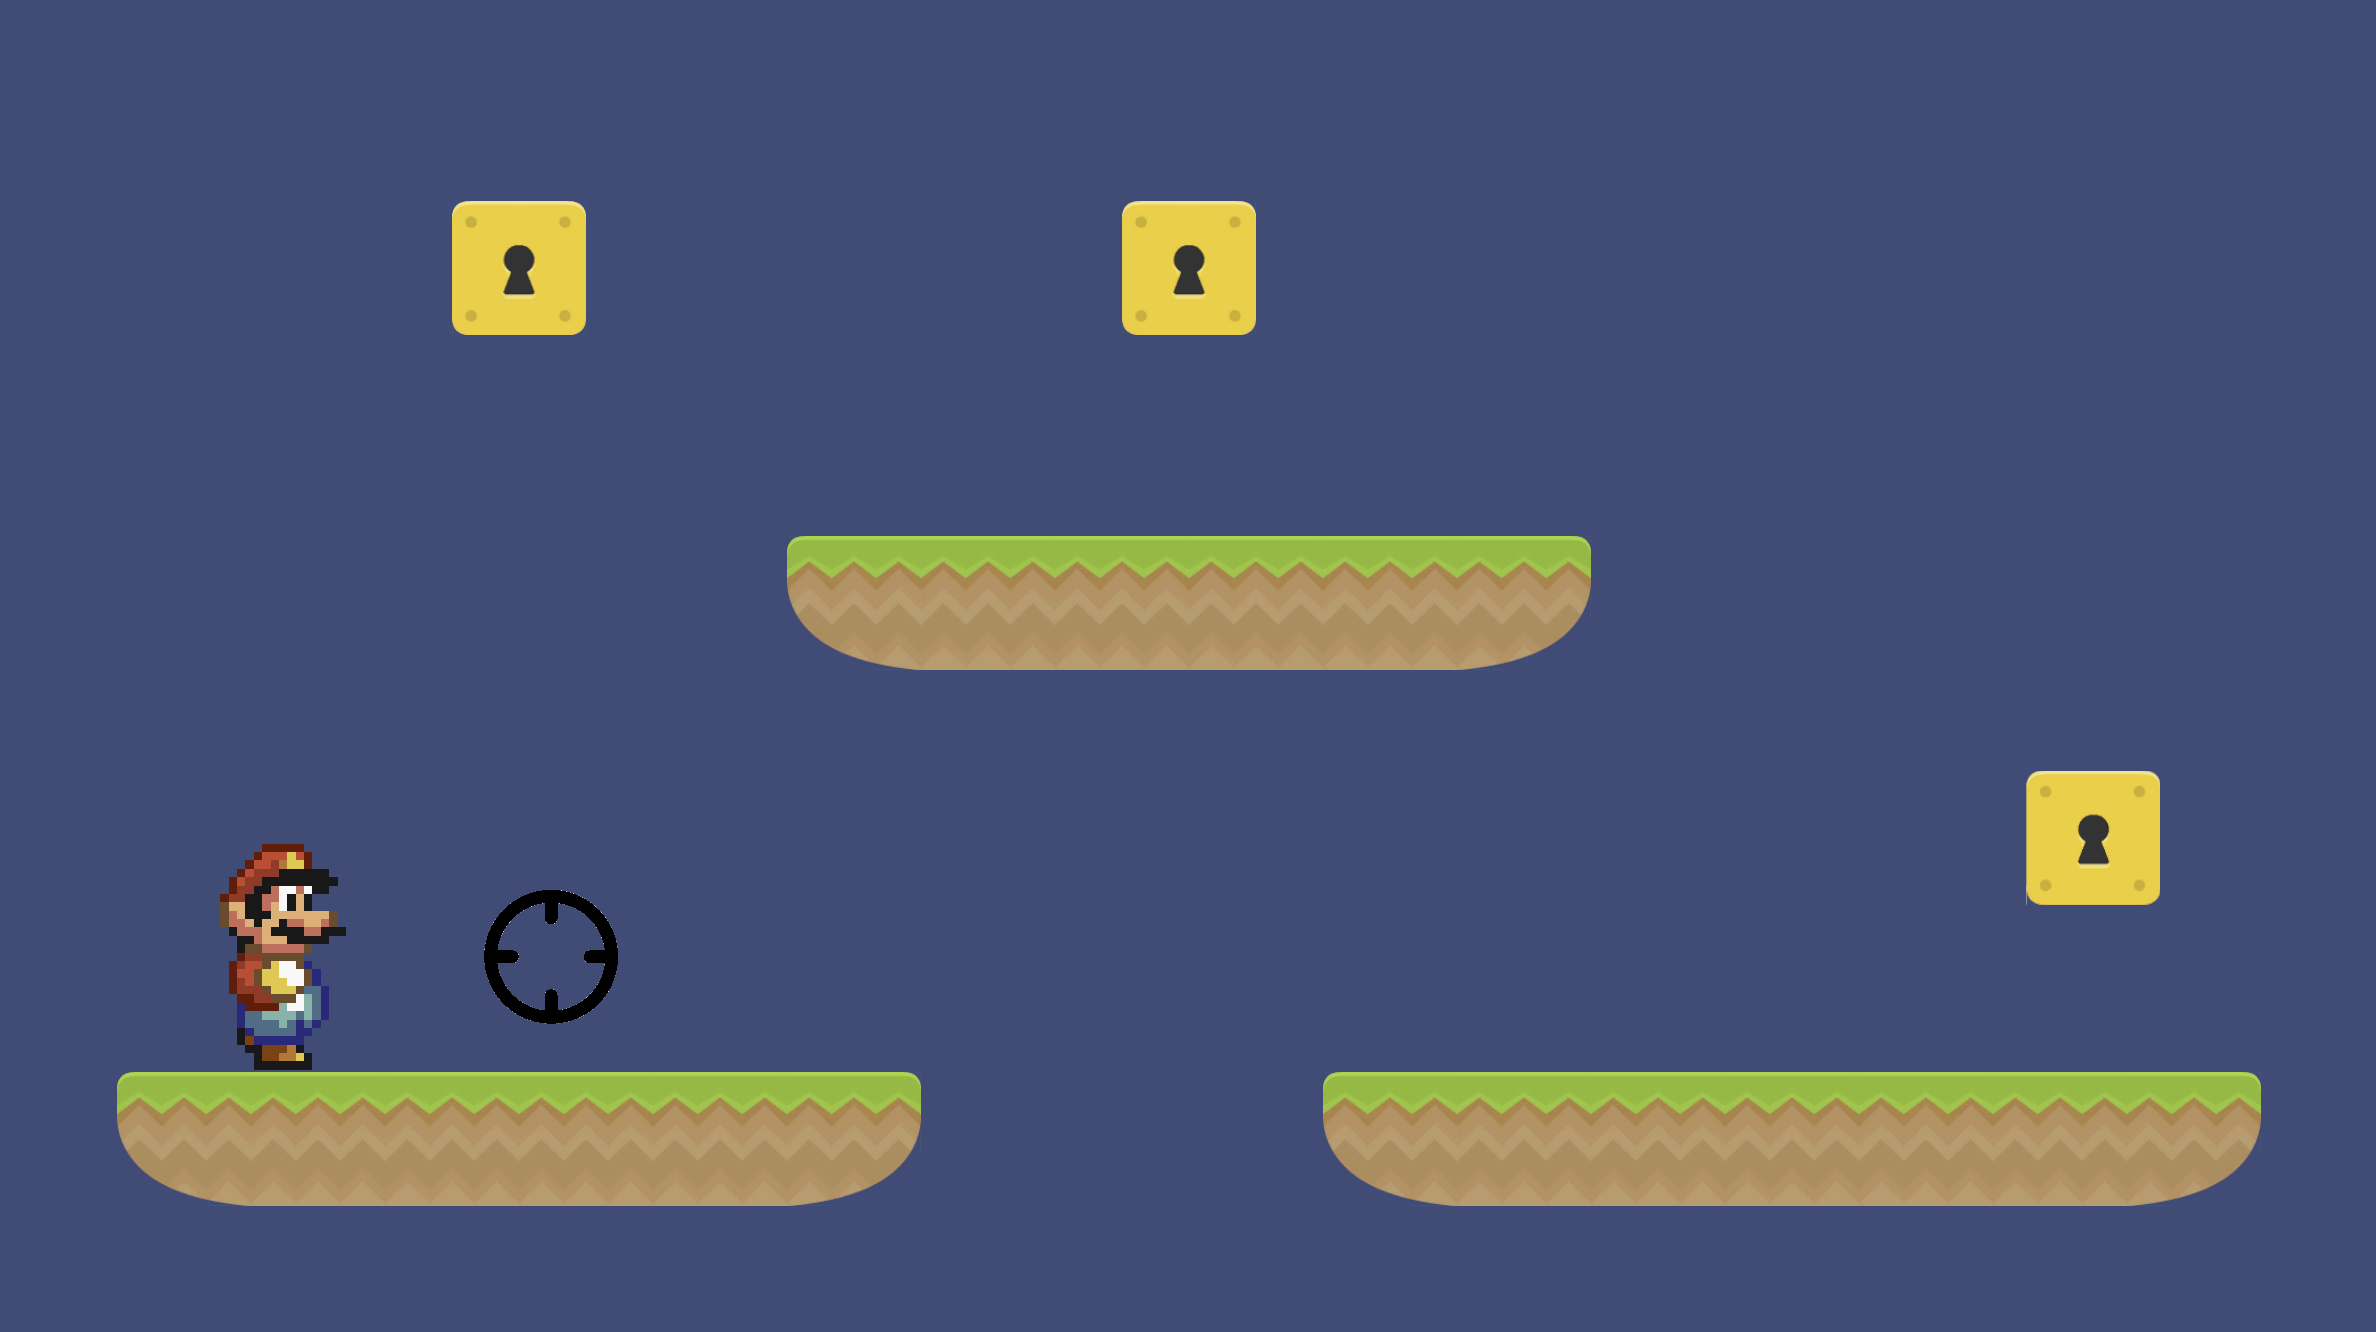
Continue Platformer
Be sure to have completed the prior two platformer assignments and reopen the Platformer scene.
Supporting files for VG1 quests are part of a single archive that you can download here.
Be sure to have completed the prior two platformer assignments and reopen the Platformer scene.
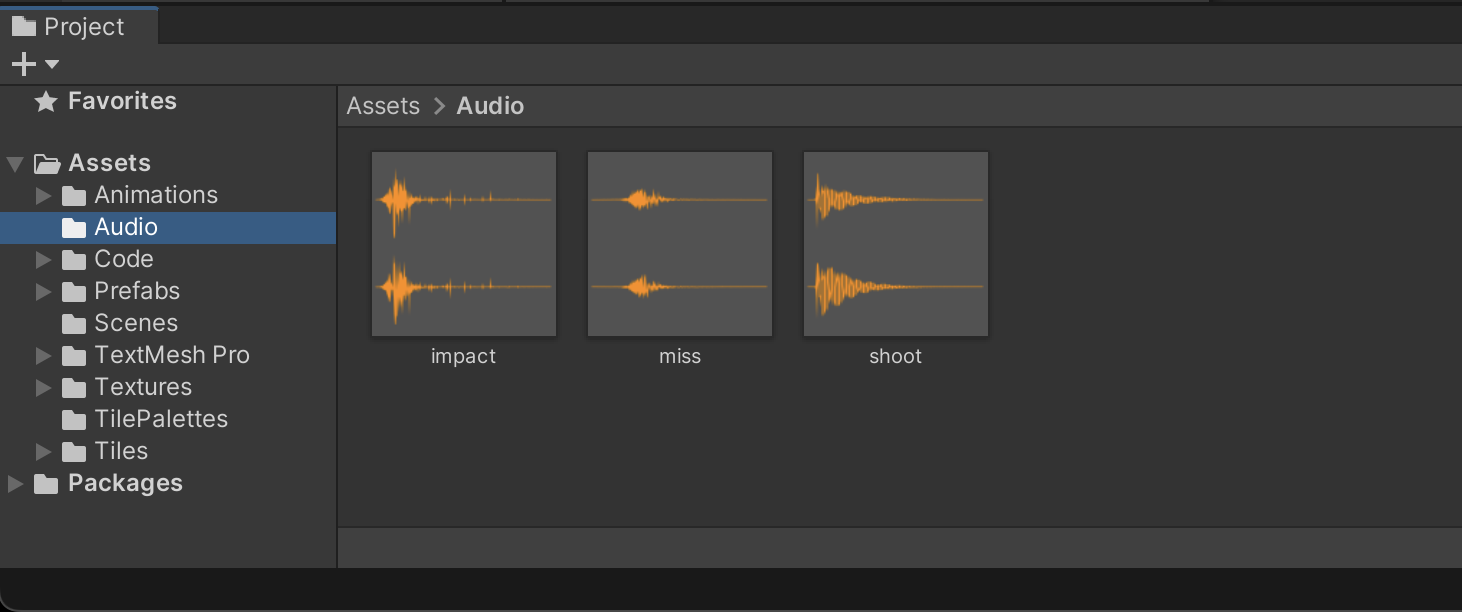
Create an /Assets/Audio/ folder and import the shoot, miss, and impact sounds from the course files.
Basic audio has three main components in Unity:
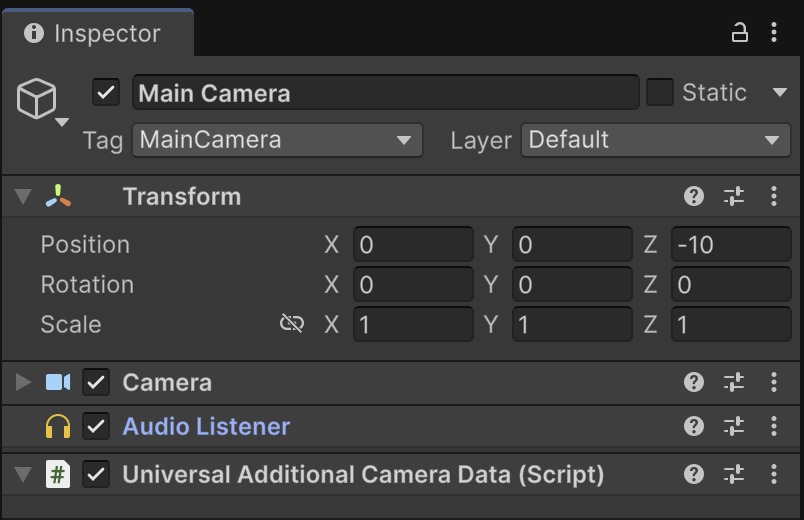
The default Main Camera scene object comes with an Audio Listener.
Inspect your Main Camera to confirm that it already has an Audio Listener. You should never have more than one Audio Listener in the scene or else your console will fill with messages warning you.
An Audio Source is a component that plays sound. Playing sounds from separate objects can give a sense of relative position between the Audio Source and Audio Listener components. Players may also perceive audio as stereo or surround sound depending on configuration.
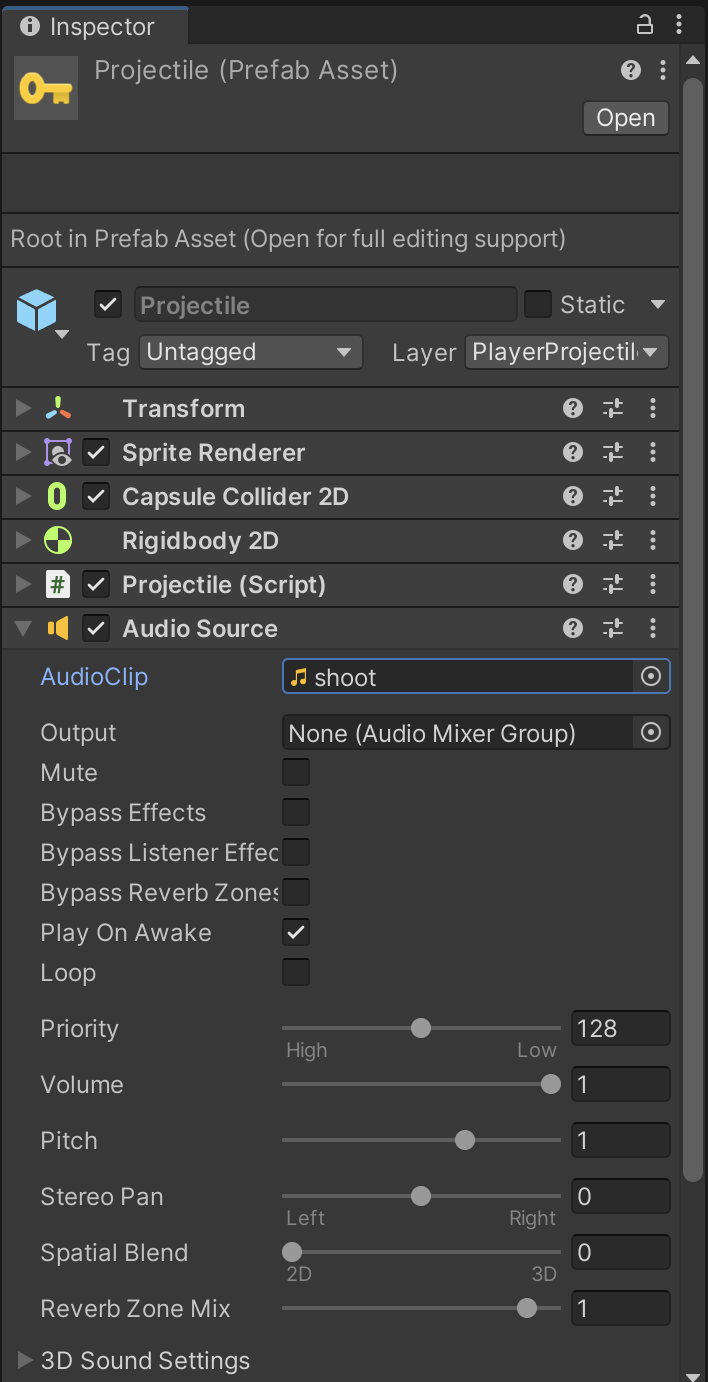
Inspect the Platformer Projectile Prefab and add an Audio Source component. Make sure Play On Awake is checked because we want the shoot sound to play as soon as we spawn the projectile. Ensure the Spatial Blend is 2D.
Drag the shoot sound asset into the Audio Generator property.
Now, whenever you fire a projectile, it automatically plays the shoot sound.
The game should also play Hit and Miss sounds when the projectiles collide with Targets and Ground, respectively. We can’t have the projectiles or targets play these sounds because they (and their Audio Source components) are destroyed right after impact.
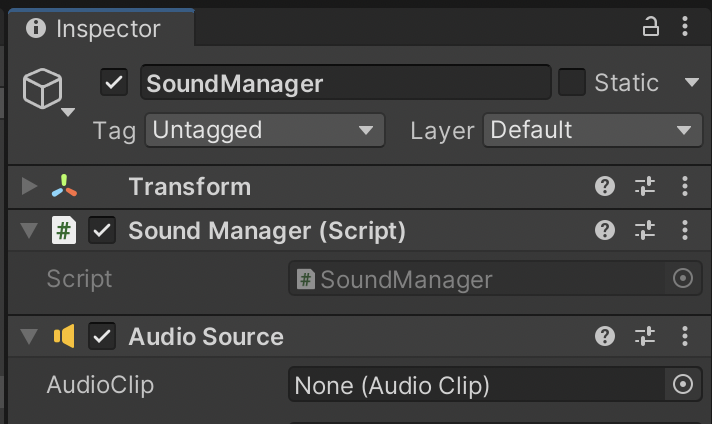
Instead, we will create a separate SoundManager object to play the different sounds.
Create an empty object in the scene and name it SoundManager. Attach an Audio Source component along with a new SoundManager script. Continue to keep any code for this assignment organized in the same Platformer folder as before.
Various objects can access the SoundManager using a Static Instance Reference similar to the GameController in prior assignments.
SoundManager.cs
using UnityEngine;

namespace Platformer {
	public class SoundManager : MonoBehaviour {
		public static SoundManager instance;

		// Methods
		void Awake() {
			instance = this;
		}
	}
}
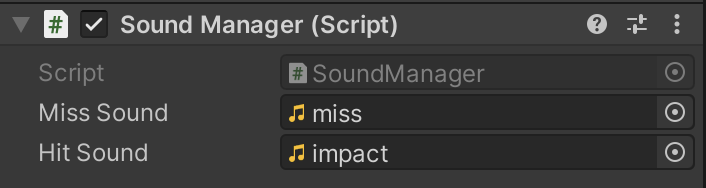
Create public outlets to configure the sound asset references. Similarly, we have to create an outlet to reference the Audio Source component.
SoundManager.cs
namespace Platformer {
	public class SoundManager : MonoBehaviour {
		public static SoundManager instance;

		// Outlets
		AudioSource audioSource;
		public AudioClip missSound;
		public AudioClip hitSound;

		// Methods
		void Awake() {
			instance = this;
		}

		void Start() {
			audioSource = GetComponent<AudioSource>();
		}
	}
}
Fill in the properties referencing the sound assets.
Next, we’ll create public functions that other objects can call to trigger various sounds.
SoundManager.cs
		public void PlaySoundHit() {
			audioSource.PlayOneShot(hitSound);
		}

		public void PlaySoundMiss() {
			audioSource.PlayOneShot(missSound);
		}
In the Platformer Projectile script, create conditions for the different sounds and call the SoundManager appropriately.
Projectile.cs
		void OnCollisionEnter2D(Collision2D collision) {
			if(collision.gameObject.GetComponent<Target>()) {
				SoundManager.instance.PlaySoundHit();
			} else if(collision.gameObject.layer == LayerMask.NameToLayer("Ground")) {
				SoundManager.instance.PlaySoundMiss();
			}

			Destroy(gameObject);
		}
There are a variety of ways that Unity can save and reload persistent data across game sessions. This tutorial covers saving simple datatypes using PlayerPrefs as a sort of persistent dictionary. These simple datatypes are string, int, and float.
We will first need to build a bare-bones score system which will later benefit from being able to save scores.
We are going to update the Platformer PlayerController to save an ongoing score counter, so the player can quit the game without losing their score.
There are several changes going on at once here:
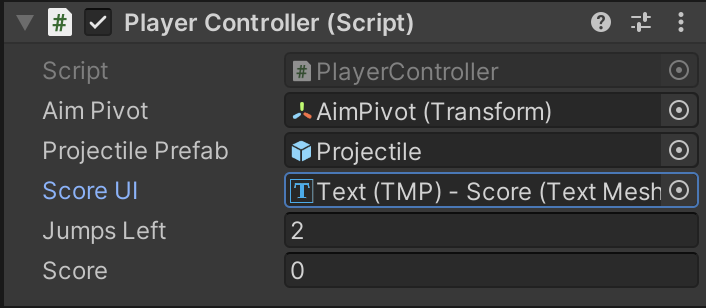
PlayerController.cs
using TMPro;

namespace Platformer {
	public class PlayerController : MonoBehaviour {
		public static PlayerController instance;

		// Outlets
		Rigidbody2D _rigidbody2D;
		public Transform aimPivot;
		public GameObject projectilePrefab;
		SpriteRenderer spriteRenderer;
		Animator animator;
		public TMP_Text scoreUI;

		// State Tracking
		public int jumpsLeft;
		public int score;

		// Methods
		void Awake() {
			instance = this;
		}
In the Update event of the PlayerController, show the current score in the UI. It is important that this code is at the top of the Update function because of pause functionality that will come later.
PlayerController.cs
		void Update() {
			// Update UI
			scoreUI.text = score.ToString();

			// Move Player Left
			if(Keyboard.current.aKey.isPressed) {
In the Target script, update the collision event so it also adds to the player’s score.
Target.cs
namespace Platformer {
	public class Target : MonoBehaviour
	{
		void OnCollisionEnter2D(Collision2D collision) {
			if(collision.gameObject.GetComponent()) {
				PlayerController.instance.score++;
				Destroy(gameObject);
			}
		}
	}
}
Create a UI Text object and adjust its formatting so it shows in the top-center of the screen. Remember to create UI that scales and is always readable across diverse devices, just like in previous exercises.

Assign the Score UI outlet on the PlayerController.
If you play the game now, score increases when you destroy targets, but the score also resets when you restart the game.
To persistently save our score, we also need to store and update an entry in PlayerPrefs whenever score changes during the Target script.
Target.cs
namespace Platformer {
	public class Target : MonoBehaviour
	{
		void OnCollisionEnter2D(Collision2D collision) {
			if(collision.gameObject.GetComponent<Projectile>()) {
				PlayerController.instance.score++;
				PlayerPrefs.SetInt("Score", PlayerController.instance.score);
				Destroy(gameObject);
			}
		}
	}
}
PlayerController must also reload prior score data during its Start event whenever the game loads.
PlayerController.cs
		void Start() {
			_rigidbody2D = GetComponent<Rigidbody2D>();
			spriteRenderer = GetComponent<SpriteRenderer>();
			animator = GetComponent<Animator>();

			score = PlayerPrefs.GetInt("Score");
		}
Now, when restarting the game, score returns to where the player left off instead of 0.
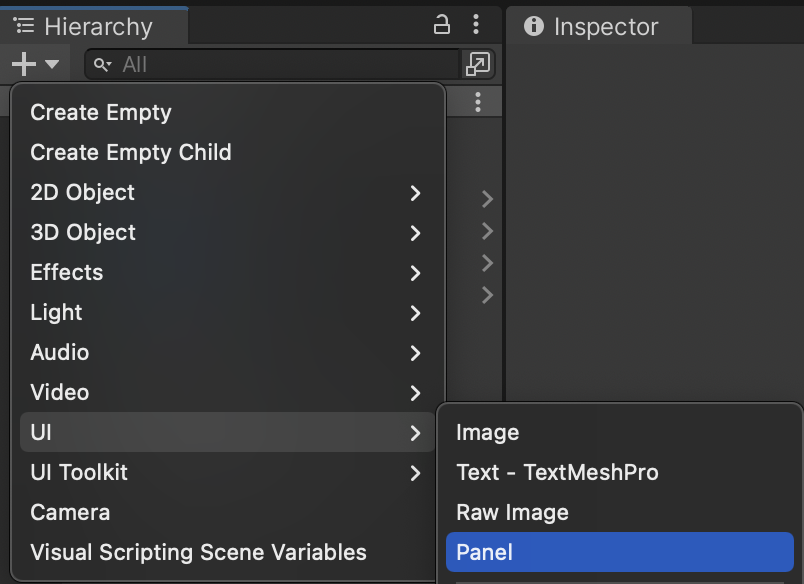
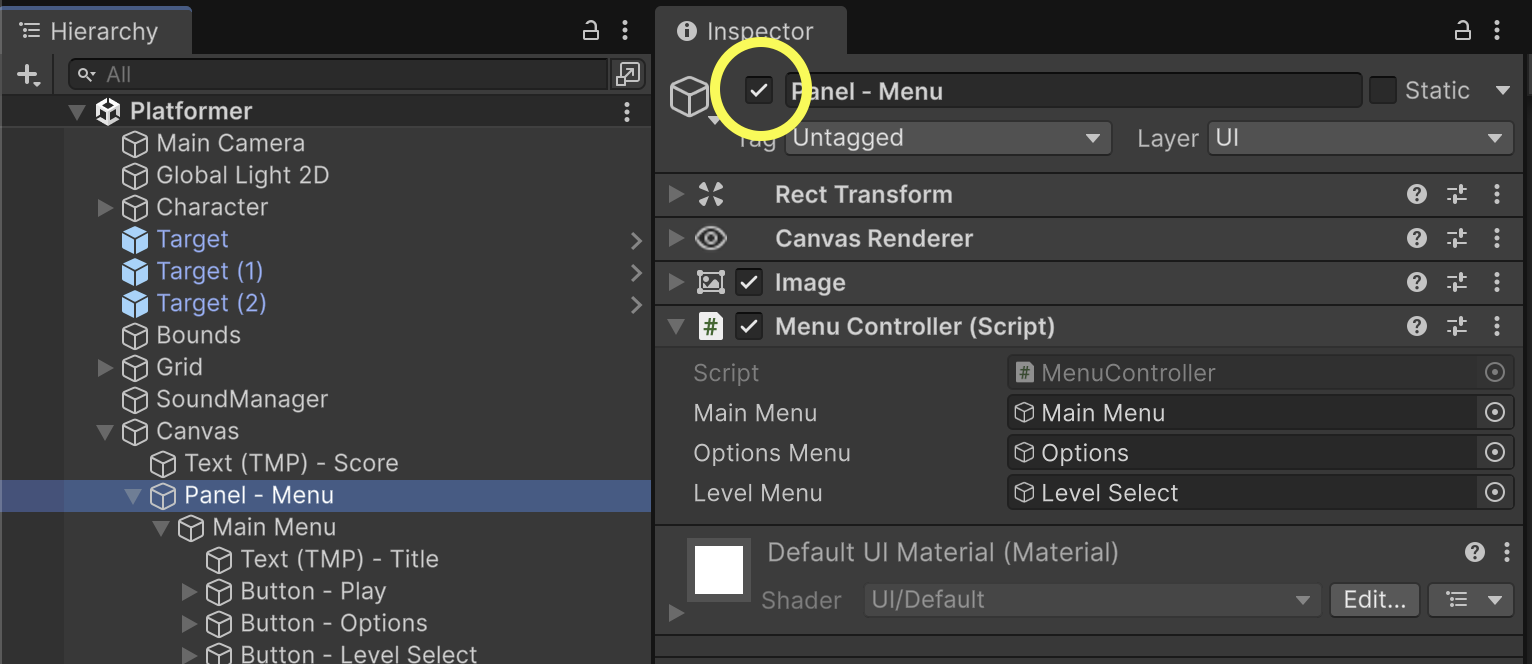
Submenus can be nested UI objects that we turn on and off as needed. We will set up a Pause Menu with submenus for Options and Level Select. All of these menus will be contained in a UI Panel which gives us a rectangle background similar to an OS window.
Remember to create UI that scales and is always readable across diverse devices, just like previous exercises.
By default, panels will stretch to fill the entire screen. Instead, we will specify a smaller portion of the middle of the screen for the pause menu. Change the color tint of the background image to remove the transparency, so that the visuals are less cluttered.
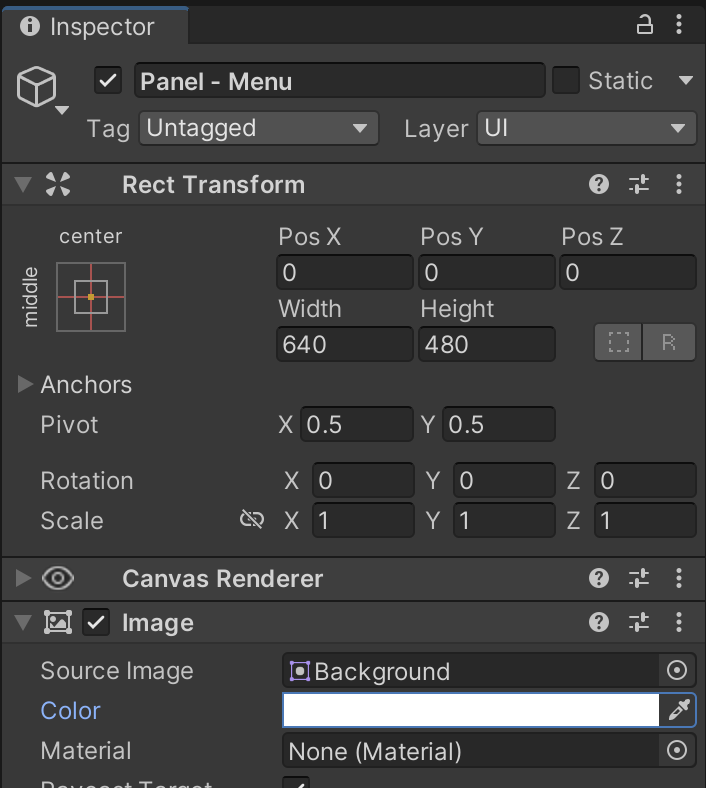
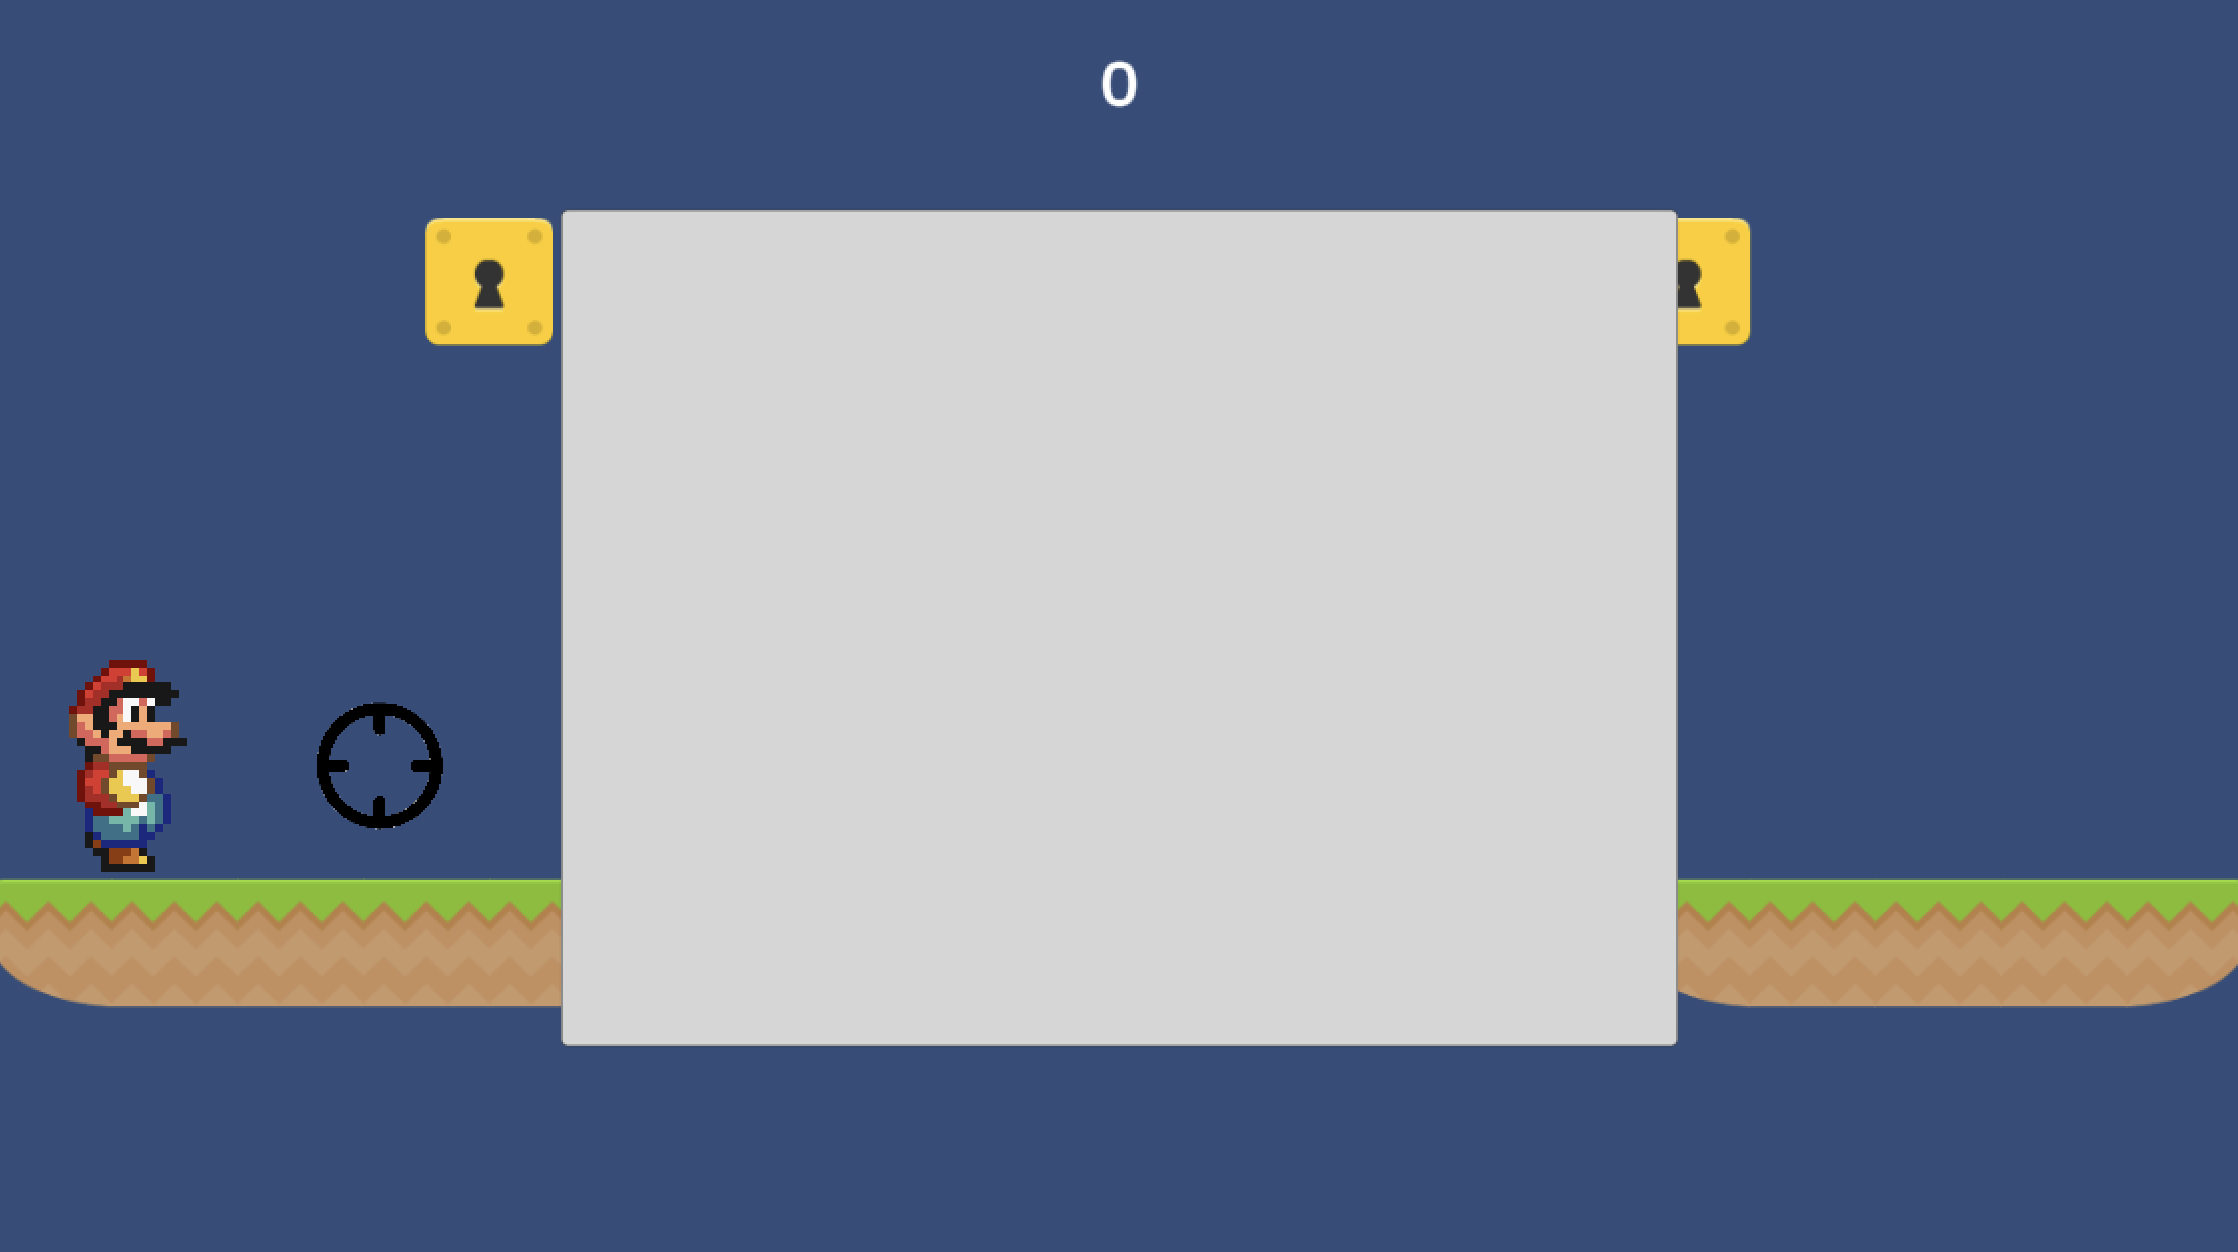
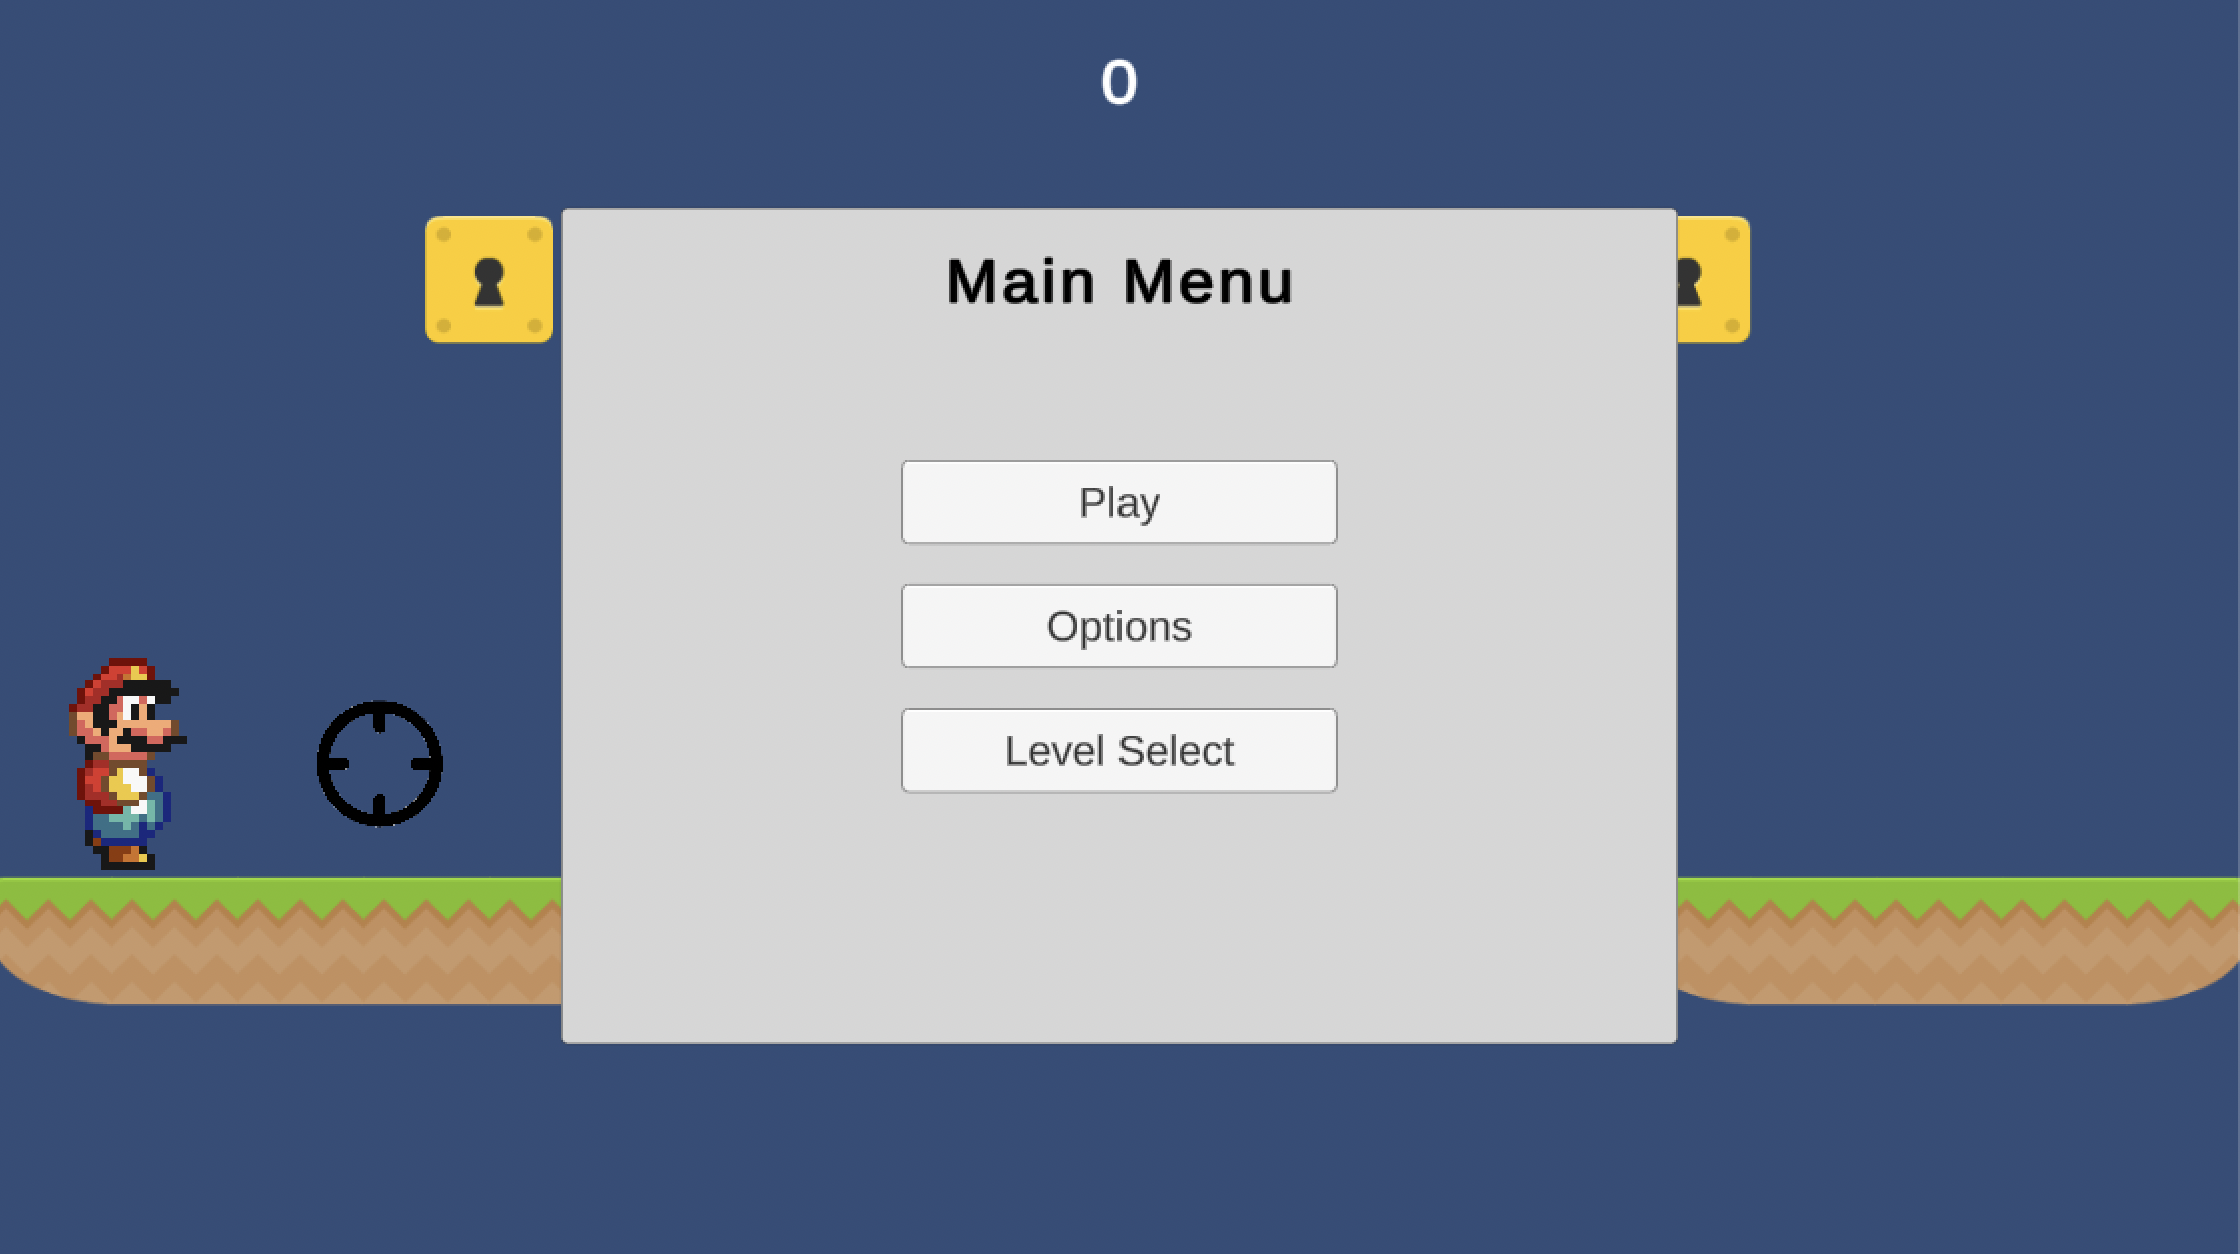
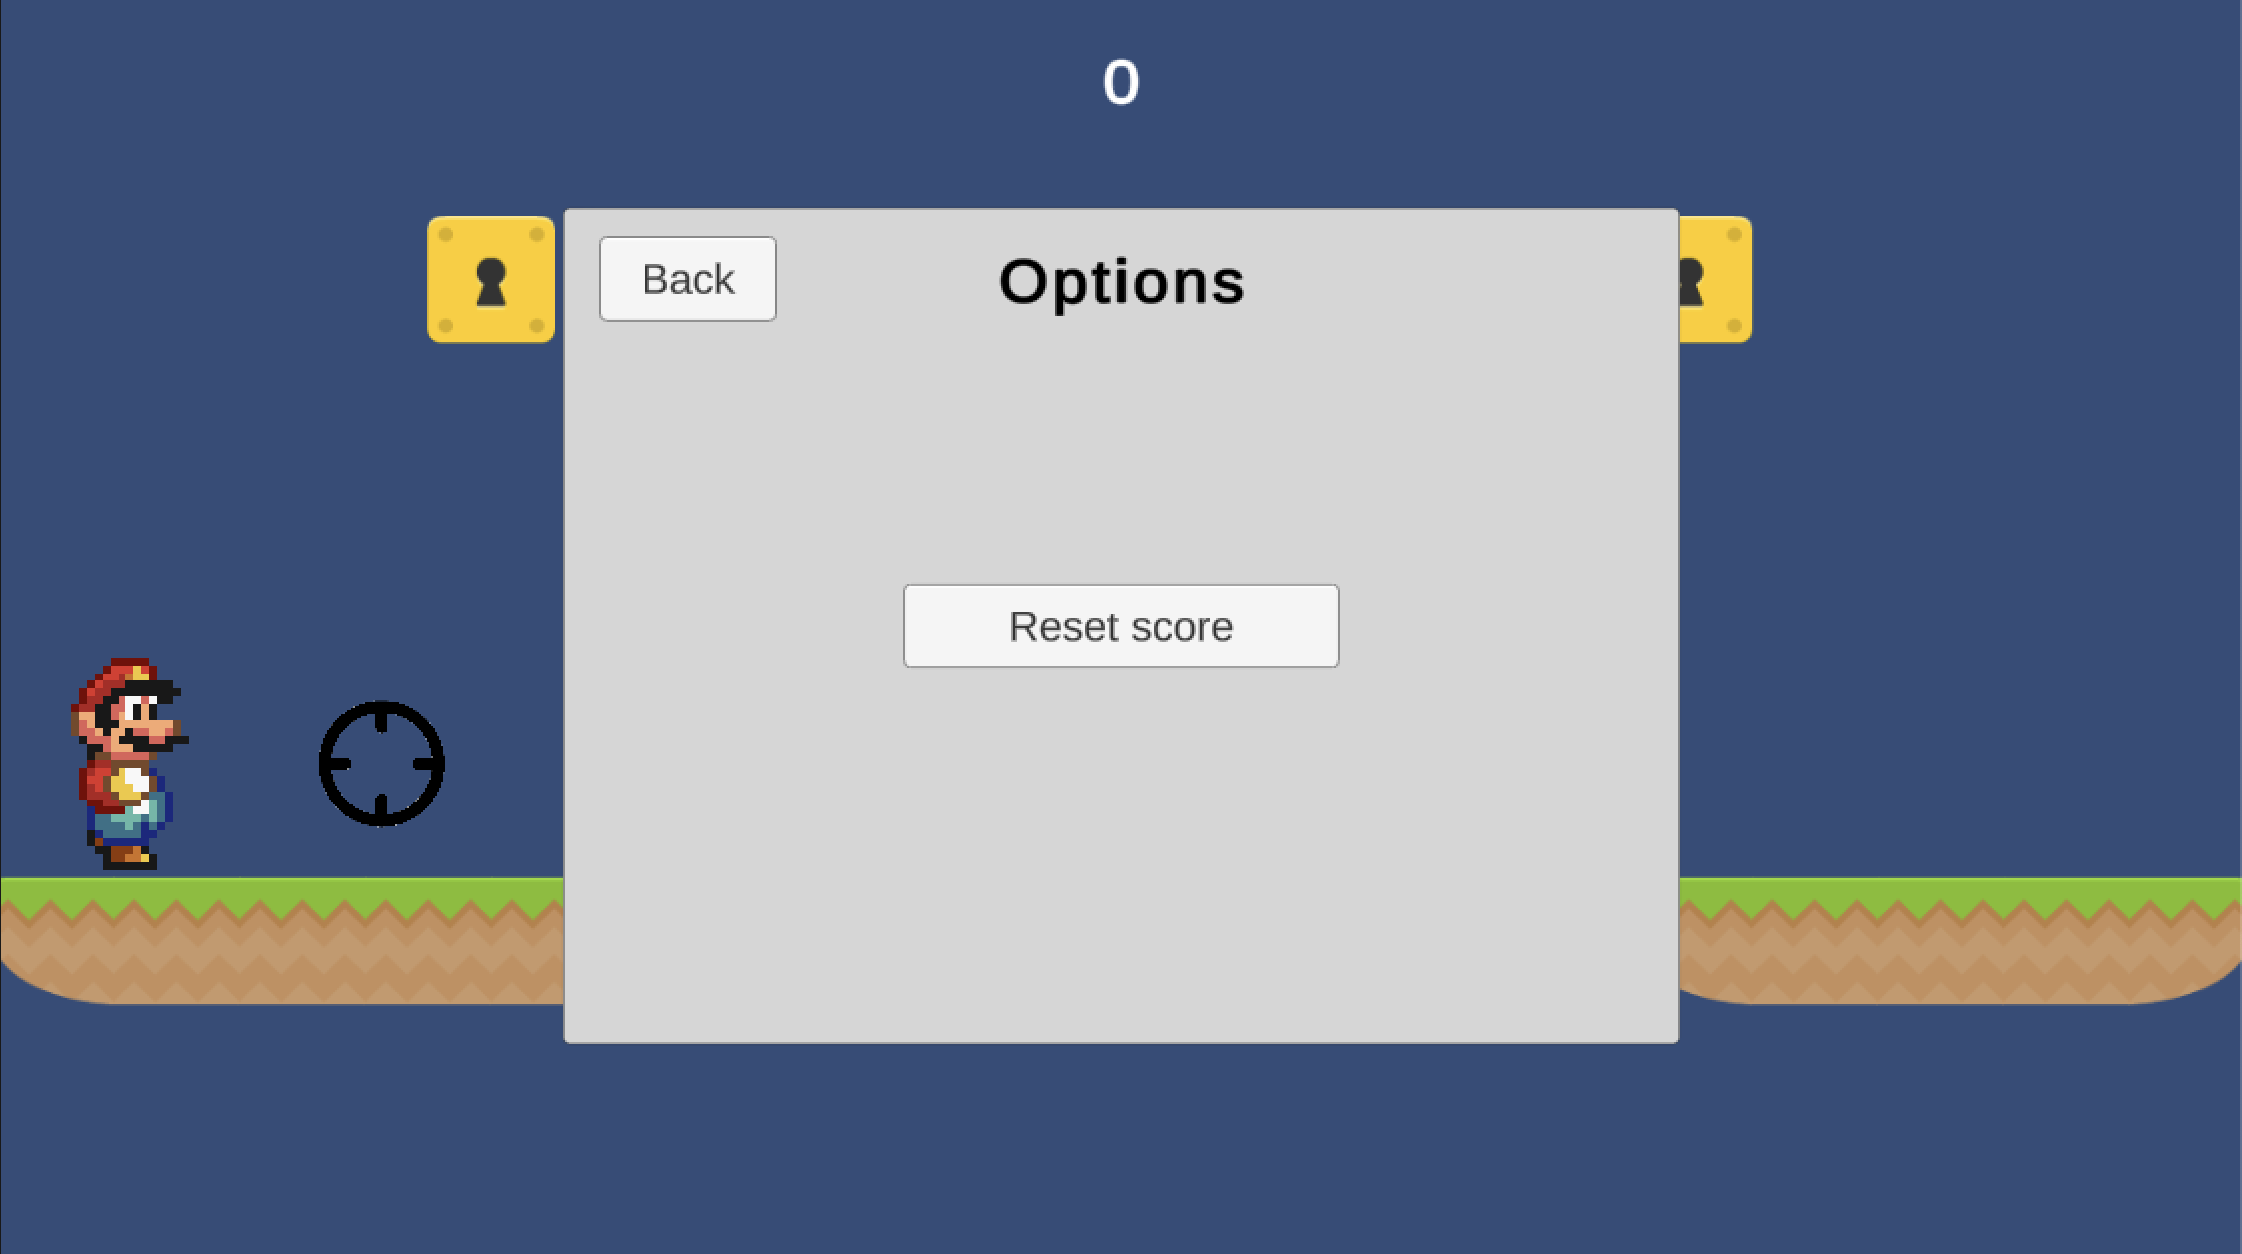
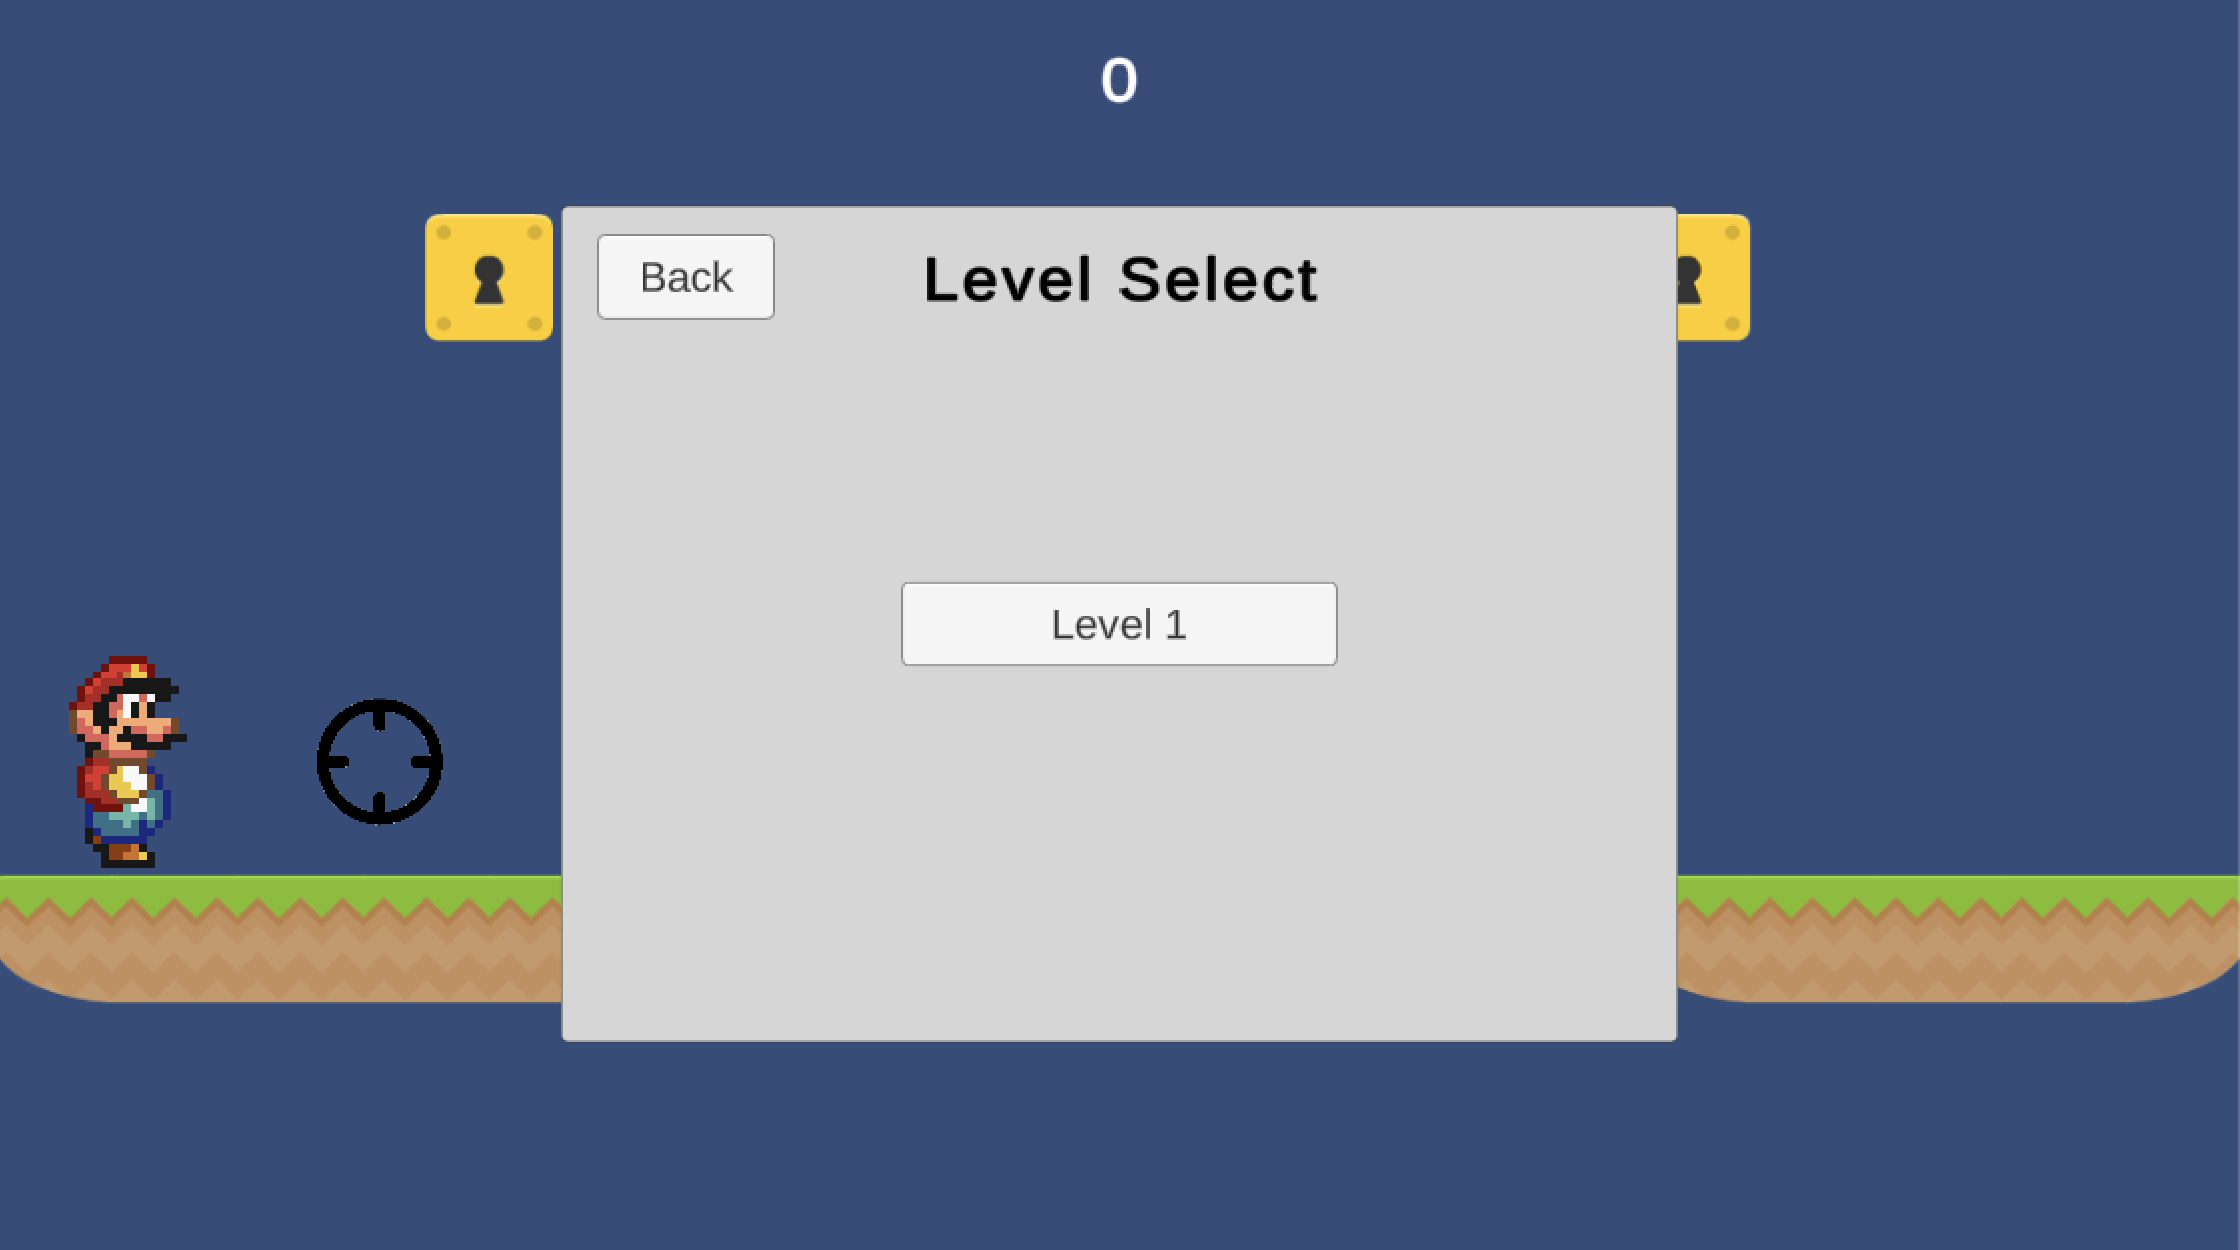
Refer to this Scene Hierarchy and these screenshots for setting up the menus.
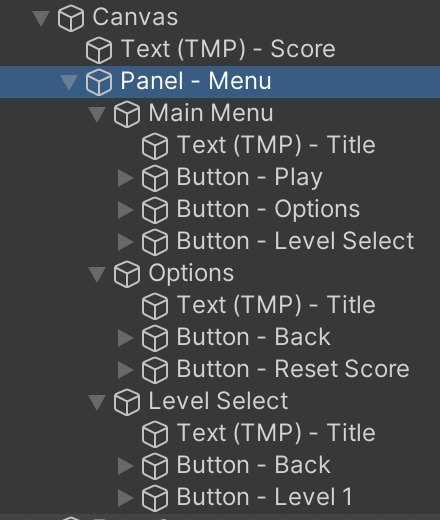
The Main Menu, Options, and Level Select scene objects are just empty objects stretched to fill the parent:

Main Menu content (when Options and Level Select are turned off):
Options menu content (when Main Menu and Level Select are turned off):
Level Select menu content (when Main Menu and Options are turned off):
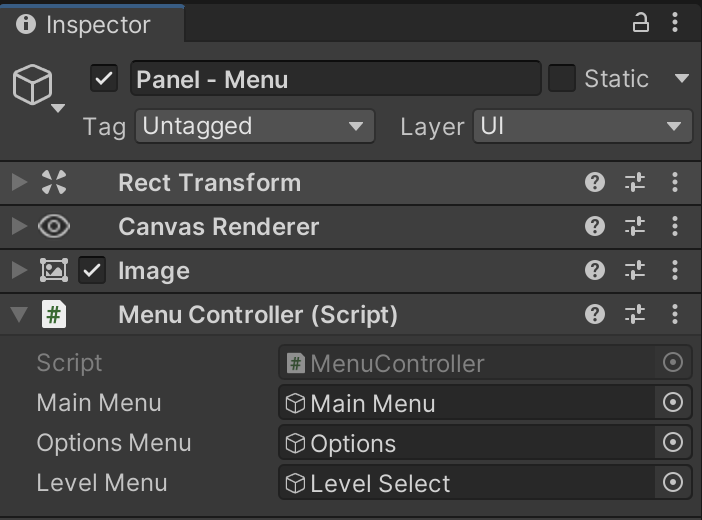
Create a MenuController script in the Platformer code folder and attach it to the Menu Panel.
MenuController is in charge of all menu and submenu logic.
There will only be one MenuController, so we can use a static instance reference to make the menu code easily accessible from other objects.
MenuController.cs
using UnityEngine;

namespace Platformer {
	public class MenuController : MonoBehaviour {
		public static MenuController instance;

		// Methods
		void Awake() {
			instance = this;
		}
	}
}
In order for MenuController to control the 3 submenus, it needs outlets to reference them.
MenuController.cs
		// Outlets
		public GameObject mainMenu;
		public GameObject optionsMenu;
		public GameObject levelMenu;
Fill in the outlet properties for the 3 submenus.
This SwitchMenu function manages cleanup when switching between menus ensuring other menus are properly turned off before another is turned on.
MenuController.cs
		void SwitchMenu(GameObject targetMenu) {
			// Cleanup Menus
			mainMenu.SetActive(false);
			optionsMenu.SetActive(false);
			levelMenu.SetActive(false);

			// Turn on target menu
			targetMenu.SetActive(true);
		}
To further streamline setting up menu buttons' click events, we’re going to create even simpler utility functions for switching to specific menus.
MenuController.cs
		public void ShowMainMenu() {
			SwitchMenu(mainMenu);
		}

		public void ShowOptionsMenu() {
			SwitchMenu(optionsMenu);
		}

		public void ShowLevelMenu() {
			SwitchMenu(levelMenu);
		}
We have a tricky timing scenario with the MenuController: We want it to be active early enough to set up the static instance reference but inactive before the player can see anything on screen at the start of the game. The first thing the player should see is the gameplay, not the pause menu.
We must have the MenuController scene object active at the launch of the game in order for it to run its Awake event and set up the static instance reference. If this event does not happen, code accessing the instance could fail and crash the game.
Since we don’t want our menu to stay visible right at the beginning of the game, the Hide function is called from the Awake after the menu has had time to set up.
MenuController.cs
		void Awake() {
			instance = this;
			Hide();
		}

		public void Show() {
			ShowMainMenu();
			gameObject.SetActive(true);
		}

		public void Hide() {
			gameObject.SetActive(false);
		}
In the Platformer PlayerController’s Update function, the Escape key will trigger showing the menu.
PlayerController.cs
			if(Keyboard.current.escapeKey.wasPressedThisFrame) {
				MenuController.instance.Show();
			}
If you playtest now, the game should begin without the pause menu visible. When the player presses Escape, the pause menu should appear and show the main menu. None of the other two submenus should be visible yet.
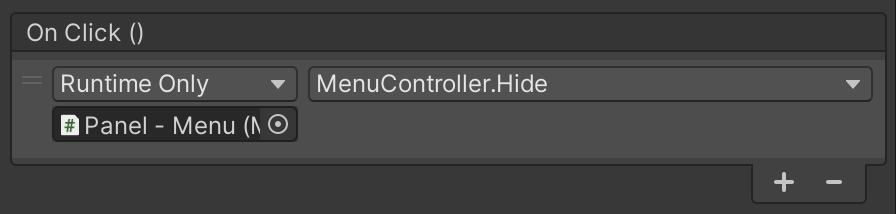
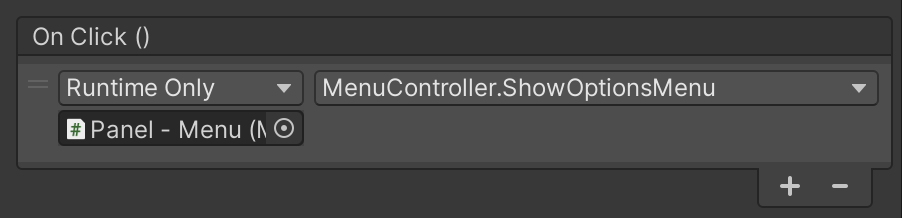
Hook up the OnClick events for the various buttons in the main menu.
The Play button hides the menu and returns to the game.
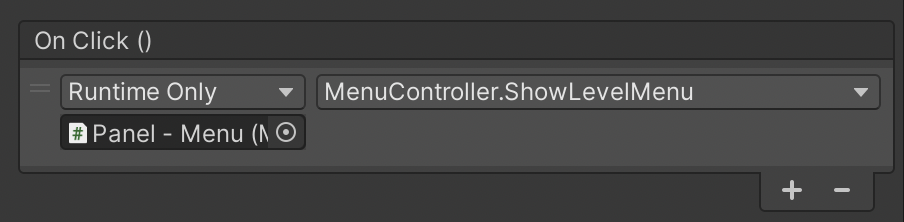
The Options button switches to the Options submenu.
The Levels button switches to the Levels submenu.
Hook up the OnClick events for the various buttons in the Options submenu.
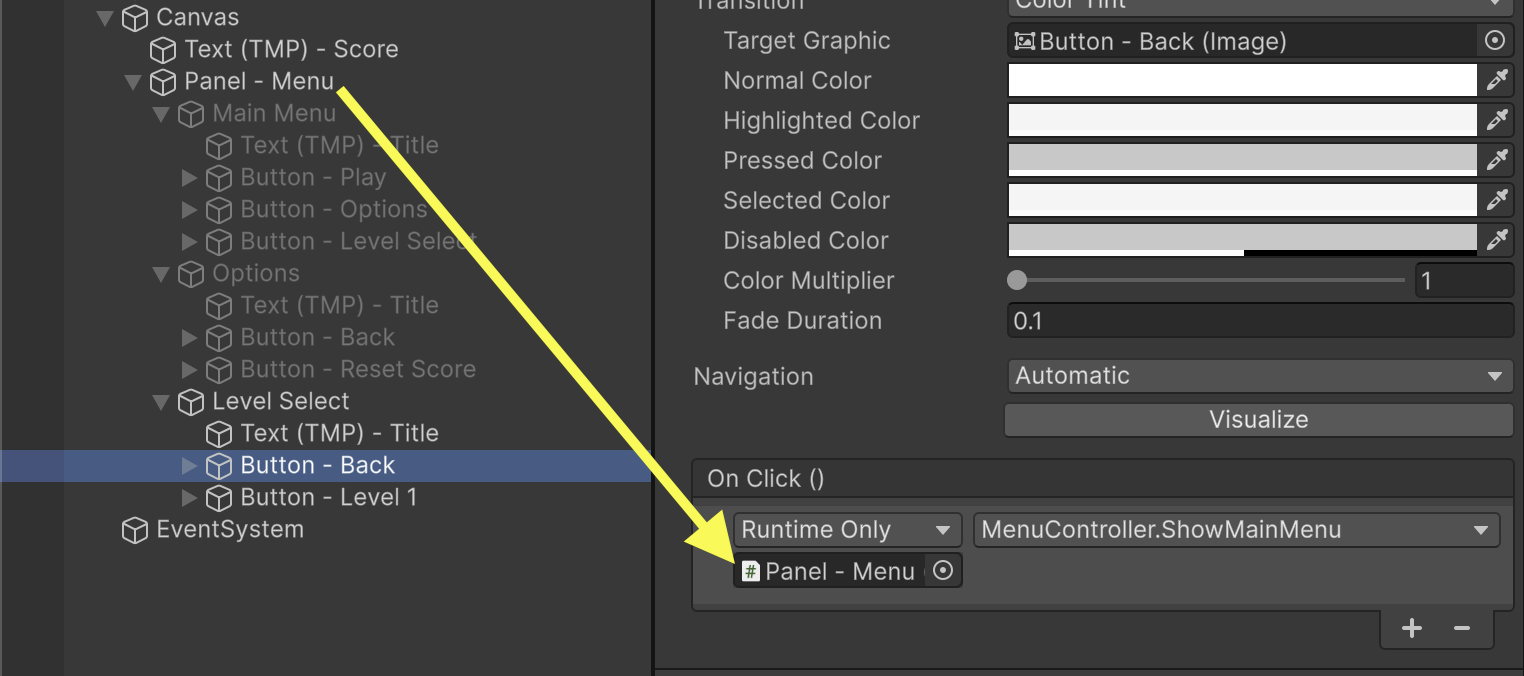
The Back button switches to the Main Menu.

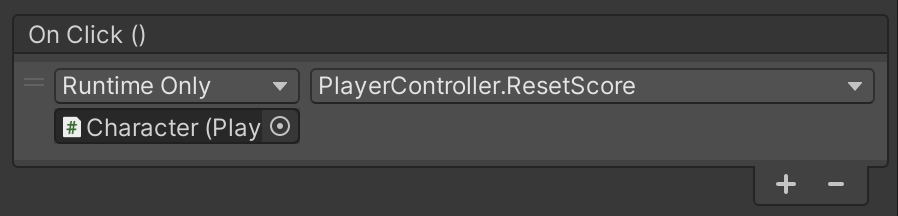
The Reset Score button requires a new function that in the PlayerController.
PlayerController.cs
		public void ResetScore() {
			score = 0;
			PlayerPrefs.DeleteKey("Score");
		}
Use the ResetScore function on the Character for the button's click event.
Hook up the OnClick events for the various buttons in the Level Select submenu.
The Back button switches to the Main Menu.
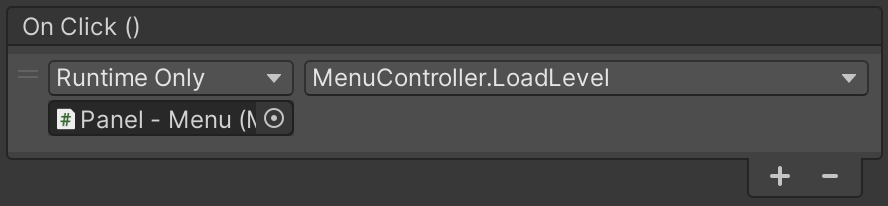
The Level 1 button requires a new function. This tutorial only has one level, so we’ll just switch to the current scene, but this function could be re-used for other levels by configuring the click event on more buttons.
When building a level select menu, make sure whatever scenes you reference are also added to the Scene List in Build Profiles, otherwise, your game may throw an error when switching scenes.
MenuController.cs
using UnityEngine;
using UnityEngine.SceneManagement;

namespace Platformer {
	public class MenuController : MonoBehaviour {
MenuController.cs
		public void LoadLevel(string sceneName) {
			SceneManager.LoadScene(sceneName);
		}
Some OnClick functions can accept a parameter or other dynamic input.
You may have noticed gameplay still continues even when the menu is on screen. Pausing has to be carefully defined by the developers, and it is not something the game engine can automatically determine. To achieve this, we have to make two changes to the game:
For the first one, we will use an isPaused boolean in the PlayerController script.
PlayerController.cs
		// State Tracking
		public int jumpsLeft;
		public int score;
		public bool isPaused;
Everything in the Update loop after the return statement will be skipped if the game is paused. This prevents the character from responding to keyboard and mouse input. The UI should NOT pause, otherwise, it will show inaccurate score data if we reset score in the menus.
PlayerController.cs
		void Update() {
			// Update UI
			scoreUI.text = score.ToString();

			if(isPaused) {
				return;
			}
Finally, we freeze the time scale and enable the isPaused property from the MenuController script whenever the menu is shown.
MenuController.cs
		public void Show() {
			ShowMainMenu();
			gameObject.SetActive(true);
			Time.timeScale = 0;
			PlayerController.instance.isPaused = true;
		}
When we hide the menu, we unpause the game by doing the opposite.
MenuController.cs
		public void Hide() {
			gameObject.SetActive(false);
			Time.timeScale = 1;
			PlayerController.instance.isPaused = false;
		}
Remember that this Hide function is also triggered by the MenuController's Awake event. This allows the menu to automatically hide itself before gameplay. Because there is no guarantee whether the PlayerController or MenuController awakes first, there is a chance you will experience a game crash if MenuController tries to access and unpause the PlayerController before the PlayerController is ready to be accessed through its instance variable.
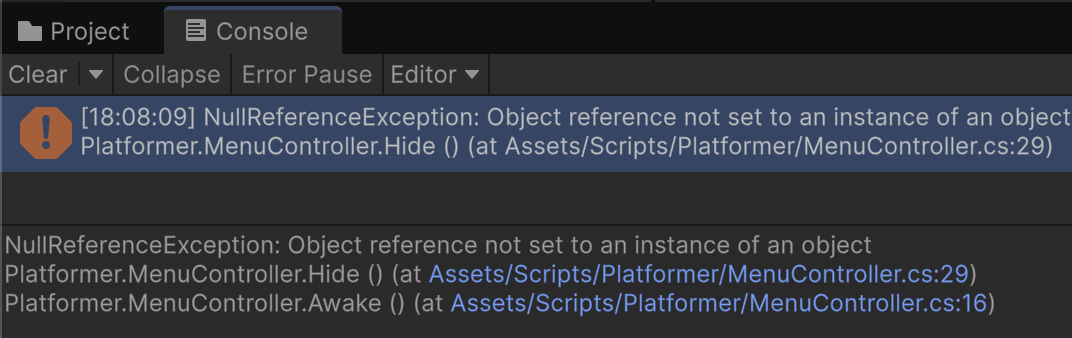
Avoid putting functionality in Awake that depends on outside objects because those objects might not yet be set up. Relying on the Start event instead helps guarantee other scene objects have had time to experience their own Awake events.
We can fix this error by removing the Hide function call from the MenuController's Awake event.
MenuController.cs
		// Methods
		void Awake() {
			instance = this;
			Hide();
		}
Instead, call the Hide function within MenuController's Start event. By the time the Start event executes, PlayerController will have run its Awake event and set up its instance variable.
MenuController.cs
		// Methods
		void Awake() {
			instance = this;
		}

		void Start() {
			Hide();
		}
Now when you playtest the game, you should see that animations, physics, and player input freeze when the game is paused. All of the various menu buttons should also work. Platformer gameplay should remain fully functional once the game is unpaused.
Playtest to ensure all interactions work as expected and that the addition of any new features hasn’t broken any earlier interactions.
SAVE any open files or scenes.
Submit your assignment for grading following the instructions supplied for your particular classroom.