Supporting files for VG3 quests are part of a single archive that you can download here.
This assignment adds a Save Data System to the Character Builder UI made in the prior tutorials. We want players to be able to continue interacting with their characters and emotes even after the game has been closed and reopened.
In essence, our save system will be an exercise in storing data structures. We establish a save system following many of the typical steps that a database engineer would follow. To build our save system:
In prior semesters, we introduced lightweight save data solutions such as PlayerPrefs. This technique continues to work well for unrelated single data points. We also previously discussed the nature of online services, cloud storage, and local file management as they relate to potential save data solutions.
While many valid options exist for a variety of production circumstances, this assignment will handle saves using local file management and JSON data. We will save JSON representations of gameplay data into text files.
Compared to our previous assignments, JSON scales better when storing data describing entire objects of numerous data points (such as characters containing a name, color, etc.; or emotes containing an icon id, frame id, etc.) and describing related objects (multiple characters each expressing their own separate collections of emotes). Such data would be difficult to track using a basic unformatted PlayerPrefs string.
Our save data will be established by processing the data across a series of 3 stages:
This assignment will also exhibit the four primary data interactions, sometimes abbreviated as CRUD:
JSON stands for "JavaScript Object Notation". It is a format for conveying structured data in plain text. Despite sharing syntax with JavaScript, JSON is a popular data format across many languages including the C# used by Unity.
Example JSON
{ "stringText" : "Hello, World", "favoriteNumber" : 6, "nestedObject" : { "positionX" : 0.0078437566715686, "positionY" : 0.3960784375667572, "positionZ" : 0.9921568632125855 }, "groceryListArray" : [ { "item" : "potato", "quantity" : 4, "isFrozen" : false, "pictureId" : 3 }, { "item" : "tomato", "quantity" : 2, "isFrozen" : false, "pictureId" : 24 }, { "item" : "iceCream", "quantity" : 123, "isFrozen" : true, "pictureId" : 0 } ], "valueArray" : [ "John", "Paul", "George", "Ringo" ], "emptyArray" : [ ], "emptyData" : null }
The above example portrays the most typical aspects of JSON structure:
Common data types we will use in our JSON:
Video game data that appears too complex to match these data types usually just needs to be broken down into simpler representations until it does match. For example, a Vector3 in Unity could be represented by a collection of 3 numbers in JSON. It may also be necessary to reference external data by an ID number, so that it can be looked up using another asset management technique. For example, we may reference player photos by ID instead of storing graphics data inside the JSON.
In the following steps, we will apply these concepts and the data modeling process to our Character Builder experience.
Data modeling begins by identifying the types of data we want to persist. You should avoid polluting save files with unnecessary data. Important data we want to restore when reloading the game fits into two objects: Character and Emote.
Character objects need to include a unique identifier (ID). Because there may be multiple characters with the same name or other similar attributes, an ID allows us to ensure we are interacting with the intended character data. Character data should also track a name, model, color, and a collection of emotes.
The data model for a Character would be:
Emotes are simple enough not to require an id. Tracking a frameIndex and iconIndex is enough to uniquely identify an emote. (Also, players are allowed to create duplicate emotes anyway because we never built any uniqueness restrictions into the game.)
The data model for an Emote would be:
Notice that we go through the effort of defining both a Character and an Emote object, but we don't do the same for a Color object. This is because the Color object is built into Unity and already has a predetermined structure including an alpha transparency channel that we don't actually use in our Character Builder:
Represented as JSON, a character object might look something like the following:
Example Character JSON
{ "id" : 0, "playerName" : "John Doe", "model" : 2, "color" : { "r" : 0.0, "g" : 0.3960784375667572, "b" : 0.9921568632125855, "a" : 1.0 }, "emotes":[ { "frameIndex" : 3, "iconIndex":4 }, { "frameIndex" : 3, "iconIndex":1 }, { "frameIndex" : 2, "iconIndex":5 } ] }
With our proposed data model, we need to create matching C# objects equivalent to these data structures. In Unity, sometimes these C# objects will be components (MonoBehaviours) if it makes sense to attach them to gameObjects in the scene. In other situations, we may code our data objects as structs or classes.
Unity has a built-in JsonUtility class to convert C# objects into JSON. JsonUtility has many functions related to JSON management that will help us implement our data model. There are also certain requirements to make C# objects compatible with JsonUtility, which you will see below.
Our Character data will be represented by a MonoBehaviour class. This will allow us to attach character data directly to gameObjects in the scene such as UI buttons representing different save files. Create a new C# file named "Character" in the Scripts folder.
Character.cs
using System.Collections.Generic; using System.IO; using UnityEngine; public class Character : MonoBehaviour { public enum Model { Figurine = 0, FigurineCube = 1, FigurineLarge = 2 } // Data public int id; public string playerName; public Model model; public Color color; public List<Emote> emotes; // Methods }
In the first couple lines, we require certain "using" statements for the functionality of this class. You may recognize "System.Collections.Generic" which we frequently use for List variables. "System.IO" contains functionality related to the file-system for saving our data.
All five members of our Character data model are represented as variables. Most of them are directly represented by the same data type (int, string, object, etc.) from our planning. One deviation from our prior notes is that we represent "Model" as an enum instead of just an int. While it is efficient for the computer to store model values as simple integers, it is more intuitive for people to work with qualitative names such as Figurine or FigurineLarge. Enums allow us to cater to both portrayals of the same data.
We will return to this file later in the tutorial to add class methods when we are ready to save the data.
Our Emotes already have a struct from a prior assignment that matches our data modeling. To make this existing code compatible with JSON, we add a Serializable attribute just before the struct definition. Serialization is the process of converting data to a format (such as JSON) that can be stored. The Serializable attribute indicates which classes and class members should be represented when serializing an object. Objects missing the Serializable attribute are not supported by JsonUtility.
EmoteConfig.cs
using System; using UnityEngine;
EmoteConfig.cs
[Serializable] public struct Emote { public int frameIndex; public int iconIndex;
We will implement actual file save functionality in a future step. For now, we are at least able to start creating Character objects and assigning data.
Our CharacterBuilder scene only operates on one Character's data at a time. It would help to have a gameObject with an attached Character component to represent our active character. Any edits to this character's data will need to reference this Character object.
Open the CharacterBuilder scene. Create a new gameObject in the hierarchy named "Character" and attach the Character.cs component to it. You can now visualize the default values of all five of the data members we had planned in our prior steps.
You may remember that MenuCharacterCreator.cs orchestrates the bulk of the logic for this scene. It would be helpful for MenuCharacterCreator to have access to our Character data object.
Open MenuCharacterCreator.cs and add an outlet variable to reference our Character component.
MenuCharacterCreator.cs
public Button buttonEmote; public Image emoteFrame; public Image emoteIcon; public Character character; // Configuration
In the Unity interface, configure this outlet property to reference the Character component.
One of our character properties is the model choice which is stored as the Model enumeration we defined in Character.cs. The choices of Figurine, FigurineCube, or FigurineLarge resolve to an integer in the save data. We want to save these changes any time the player chooses a different model in the UI. This happens in the existing SwitchCharacter function of MenuCharacterCreator.
MenuCharacterCreator.cs
public void SwitchCharacter(int index) { // Validate Input if(index >= 0) { // The active character button is not interactable if(characterButtons.Length > index) { foreach(Button button in characterButtons) { button.interactable = true; } characterButtons[index].interactable = false; } // Switch active character preview if(characterRenders.Length > index) { characterImage.texture = characterRenders[index]; } // Save model choice to character data character.model = (Character.Model)index; } }
Because our UI processes model choices using arrays and integers, we have to cast the array index integer as a Character.Model enum using parentheses in line 94. You can also visualize this data being tracked in realtime by inspecting the Character component during gameplay and choosing different models in the UI.
Of our Character attributes, we have only set up state tracking for "model" so far. We will hook up Character name, color, and emotes in separate steps.
Players use a input text box to type a character's name. We previously created this UI, but left it without any event configuration.
Input text events work similarly to UI button click events. You write a function that you hook up to a UI event in the inspector. Return to MenuCharacterCreator and add this function to save text input to our character data. Just like button events, this function must be public in order for the UI compoment to reference it.
MenuCharacterCreator.cs
IEnumerator ShowEmoteTimer() { emoteFrame.gameObject.SetActive(true); yield return new WaitForSeconds(0.5f); emoteFrame.gameObject.SetActive(false); } public void PlayerNameChanged(string newName) { character.playerName = newName; } }
Inspect the input field for the player name, and assign the PlayerNameChanged function as the event for OnValueChanged. PlayerNameChanged appears twice in the functions list, so be sure to use the "dynamic" version. This ensures that the function receives the live text typed by the player rather than a static string.
Inspecting the Character component during gameplay should show that whatever is typed in the input text field shows up in the character data.
Characters have three customizable color channels (red, gree, and blue). Each of these colors are influenced by any combination of UI sliders and text input fields. Because color customization already works from prior exercises, much of the code is already present. We must refactor existing code to replace the old temporary characterColor variable with our new character variable instead. Start by deleting the old temporary variable.
MenuCharacterCreator.cs
// Configuration public EmoteConfig emoteConfig; // State Tracking Color characterColor; // TEMPORARY. Will be replaced with save data. // Methods
The scene sets up model colors during the Start event. The Start function needs to be modified to use character color data instead of the old temporary variable.
MenuCharacterCreator.cs
void Start() { SwitchCharacter(0); // Read default character color if(characters.Length > 0) { // (All characters have the same color) character.color = characters[0].GetColor(); } SetColorUI(character.color); ShowScreen(Screen.Character); }
Each of the ChangeColor functions also needs to switch to the new character variable. For every appearance, replace "characterColor" with "character.color" instead.
MenuCharacterCreator.cs
public void ChangeColorRed(float value) { character.color.r = value / 255f; SetColorUI(character.color); foreach(CharacterModel model in characters) { model.SetColor(character.color); } }
MenuCharacterCreator.cs
public void ChangeColorGreen(float value) { character.color.g = value / 255f; SetColorUI(character.color); foreach(CharacterModel model in characters) { model.SetColor(character.color); } }
MenuCharacterCreator.cs
public void ChangeColorBlue(float value) { character.color.b = value / 255f; SetColorUI(character.color); foreach(CharacterModel model in characters) { model.SetColor(character.color); } }
Inspecting the Character component and color property during gameplay should show that the red, green, and blue color values reflected in the character data also match the gameplay UI.
Of all the Character properties, only ID and the emotes list remain unimplemented. Both of these will be covered in this step.
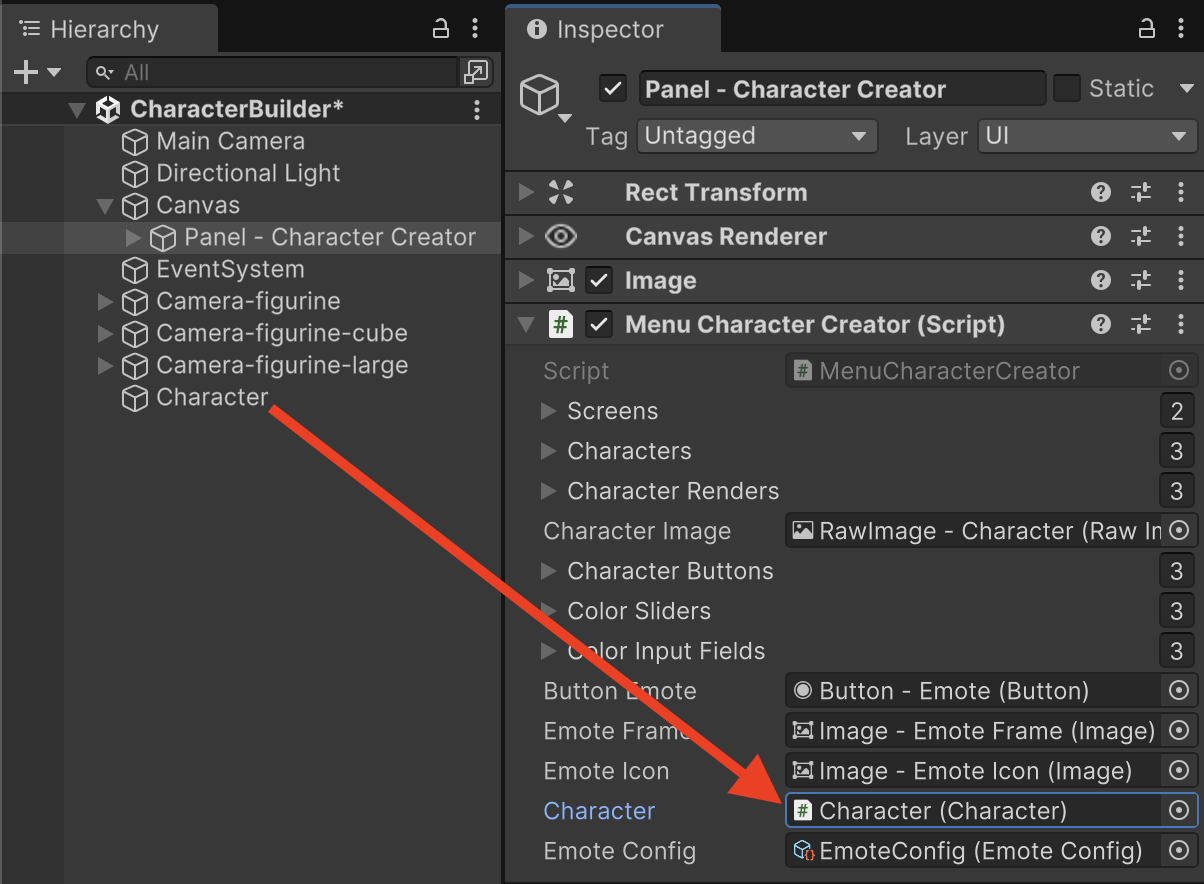
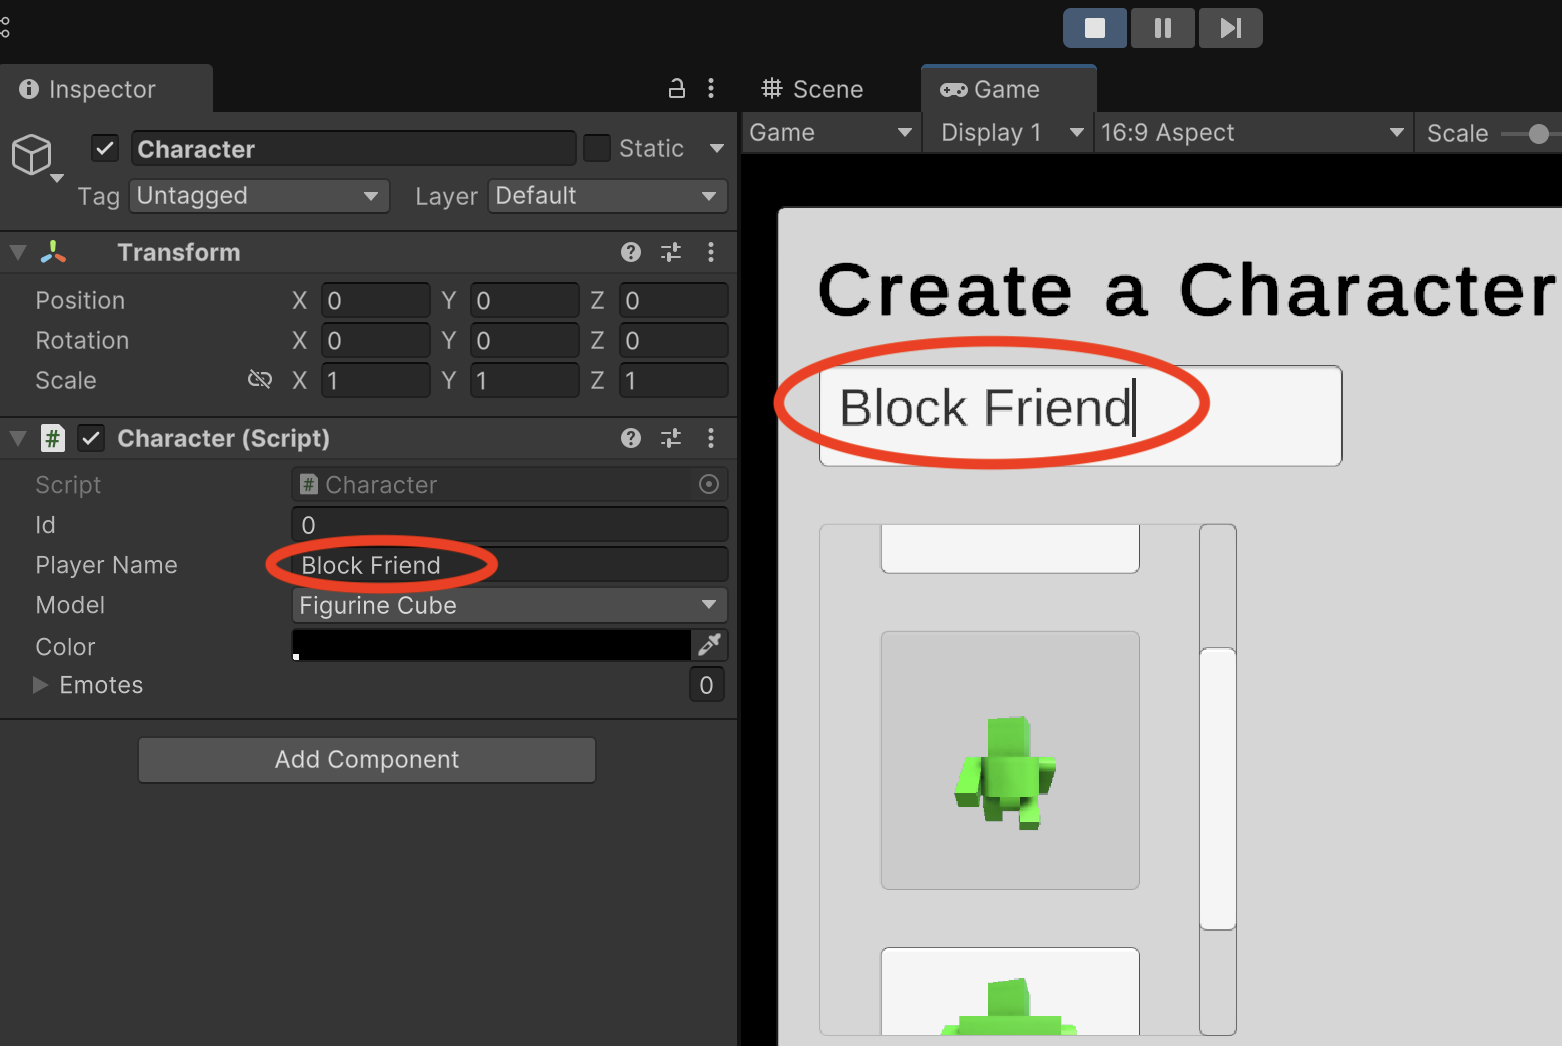
So far, we can visualize all of our character choices being aggregated in the inspector for the Character component. However, all of those changes are still lost when we stop the game. To persist these changes, we need to store the data we see in the inspector to the file system.
Remember that our 3-part process started with modeling the data structure we want to save, followed by implementing the structure in C# objects, and finishes by storing a JSON representation to the file system. We will add additional functions to our Character class that will handle JSON and file system operations.
Return to Character.cs and add these JSON helper moethods:
Character.cs
// Methods public string ToJson() { return JsonUtility.ToJson(this); } public void LoadFromJson(string json) { JsonUtility.FromJsonOverwrite(json, this); }
ToJson converts an instance of our Character C# object into a JSON string. LoadFromJson goes the opposite direction and accepts a JSON representation of a character and converts it back to an instance of our C# object. ToJson will be used when we want to save data, while LoadFromJson will be used when we want to restore data from a save file.
When saving to the file system, you have reliable access permissions to a specific folder located at the persistent data path 🔗. (It may be worth reviewing this link to see the latest information on where Unity games will store persistent data on your device.) You also have some freedom to organize directories and files within this persistent data path. For security reasons, many modern platforms do not give you free reign throughout the entire file system, which is why we rely on access to this particular folder.
The persistent data path differs across operating systems, and different platforms also use different slashes (\ or /) when addressing folders. Because of this inconsistency, we must avoid hardcoding file addresses in our code. Instead, we use Unity's helper methods and environment properties to compose addresses that are reliable across different gaming platforms.
Character.cs
static string GenerateDirectoryPath() { return Application.persistentDataPath + Path.DirectorySeparatorChar + "Characters"; } static string GenerateFilePath(int charId) { return GenerateDirectoryPath() + Path.DirectorySeparatorChar + charId + ".json"; }
These two helper methods reliably generate cross-platform addresses for accessing our game's save folder and save files. Notice in this code that we do not hardcode any particular folder and instead rely upon Unity's application and path configuration. You can also see that these functions are written as "static" because we do not require a particular Character instance to utilize them, unlike our JSON helper functions which only make sense within the context of a Character instance.
On my personal device, this code generates file addresses such as ~/Library/Application Support/DefaultCompany/VG3_SantosRobert/Characters/1.json, but because my platform may differ from yours, your own save directory may be drastically different. (You will see debugging code to help you find your save files in an upcoming code snippet.)
Our game will utilize a separate file for each character stored in the "Characters" directory. To avoid naming collisions, the filename will be based on a unique incrementing ID.
Character.cs
// Generate new id int FindUnusedId() { int result = 1; // Check if file/id exists while(File.Exists(GenerateFilePath(result))) { result++; } return result; }
In the FindUnusedId function, we start with file ID #1 and increment, checking for used filenames until we find an unused number to use as both the ID and filename.
Character.cs
public void SaveToFile() { // New characters need an id and filename if(id <= 0) { id = FindUnusedId(); } string path = GenerateFilePath(id); string directory = Path.GetDirectoryName(path); if(!Directory.Exists(path) && directory != null) { Directory.CreateDirectory(directory); } StreamWriter sw = new StreamWriter(path); sw.Write(ToJson()); sw.Close(); // print("Saved to " + path); // Debugging }
Saving to the filesystem takes a few steps. First, we determine if we are making a new save file, or updating an existing character. Because the id property is an integer, it initializes to 0 by default for new characters. This means, we can rely on id 0 being the indicator for requiring a new save file, while all other positive ids mean a save file for that character already exists. (Lines 50 to 53)
Whether we have generated a new id or are using an existing id, we next assemble a save file address based on the id. We check that the save directory actually exists and create that directory too if necessary. In many file management functions, you cannot create a file if its parent directory does not already exist first. (Lines 55 to 60)
Finally, we utilize a class known as the StreamWriter to create our new JSON text file and write our data into it. It is important to clean-up after your file access, so other processes can have their turn editing a file, which is why you should "Close()" out your file operation. Notice that I have also provided debugging code at Line 66. I recommend you uncomment this line, so that the game will tell you where to find your save file in order for you to check your work. (Lines 62-66)
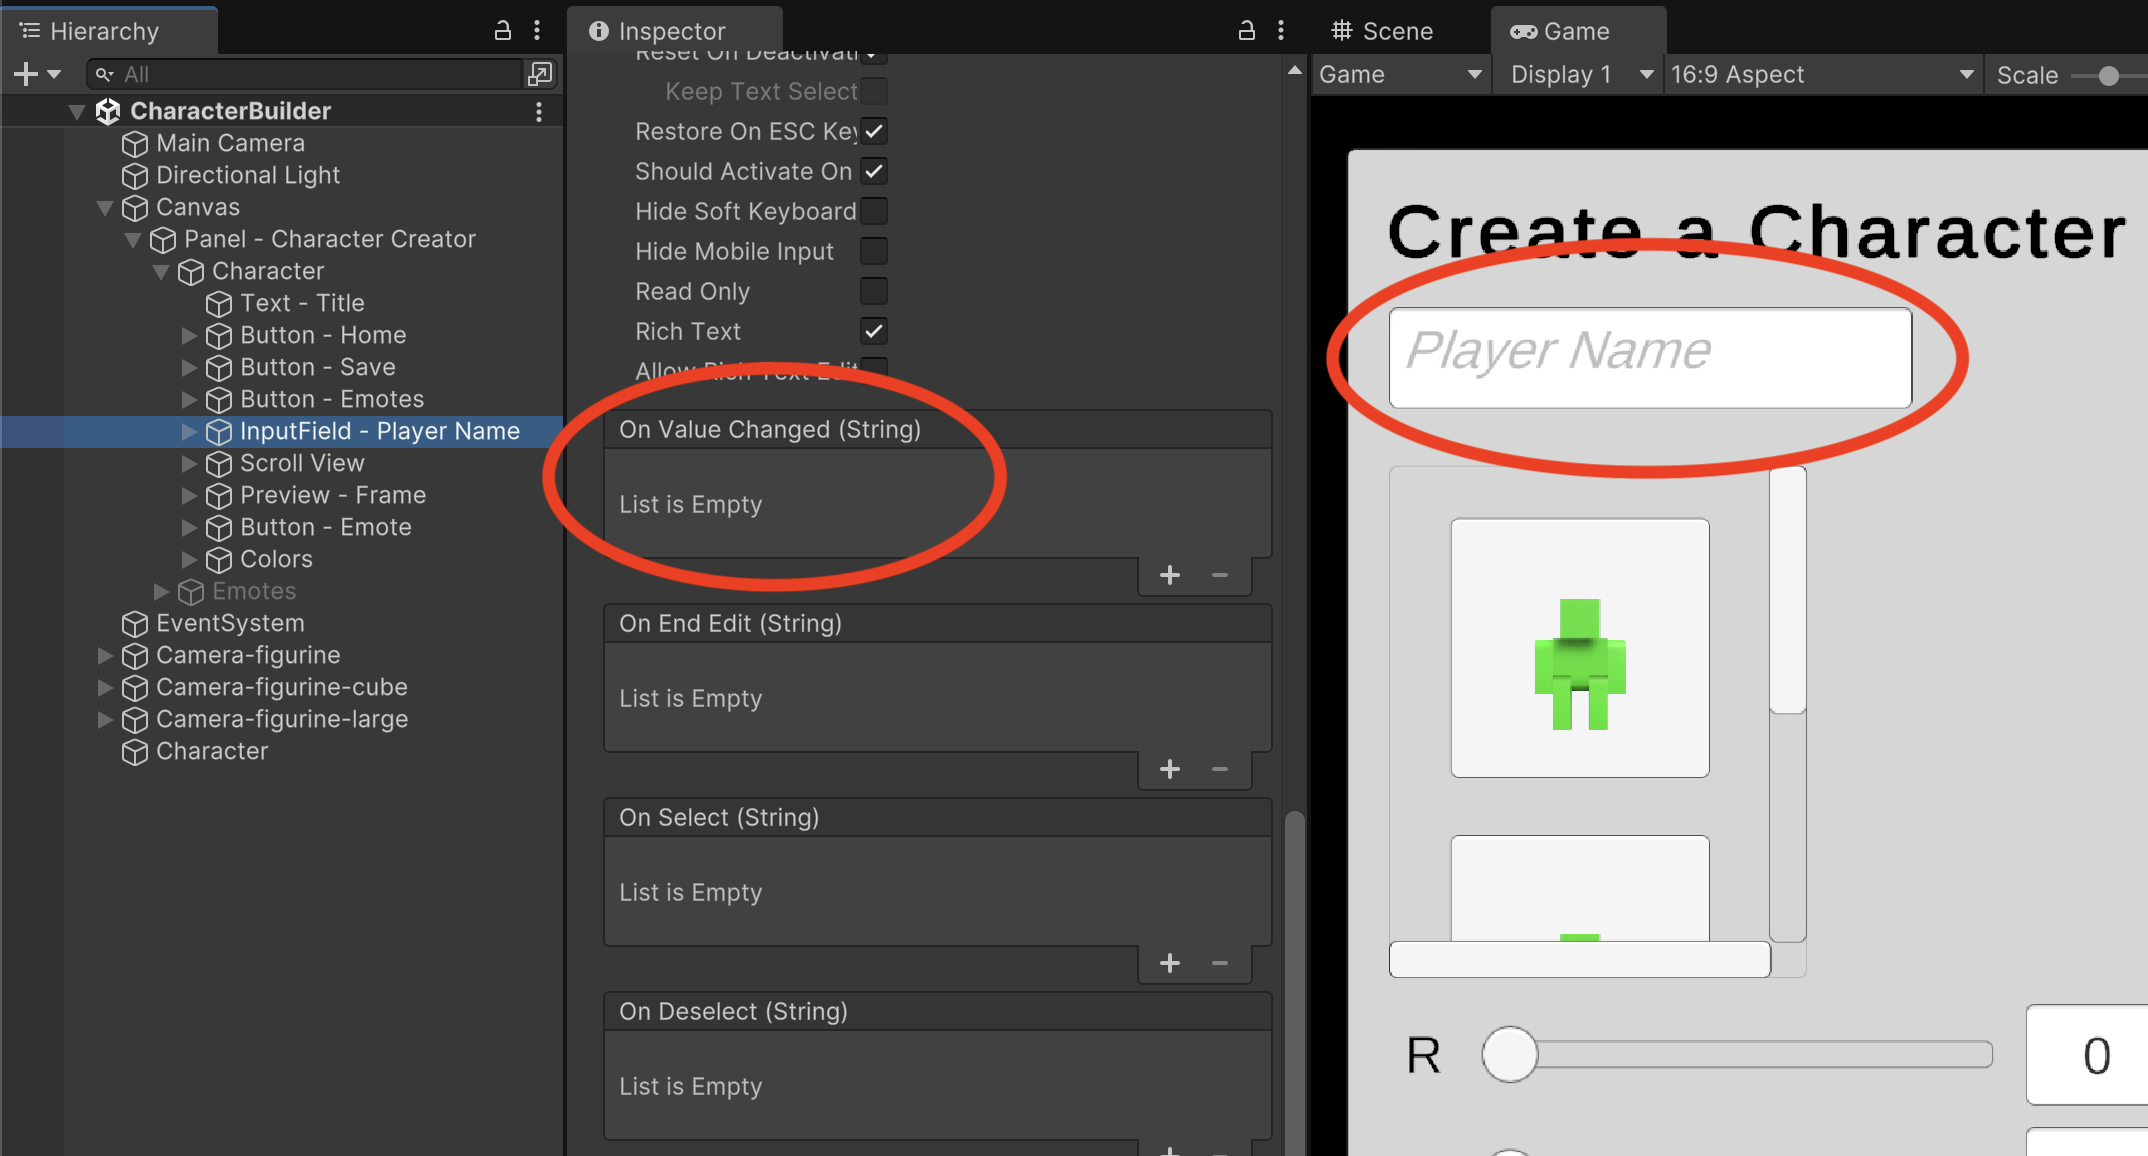
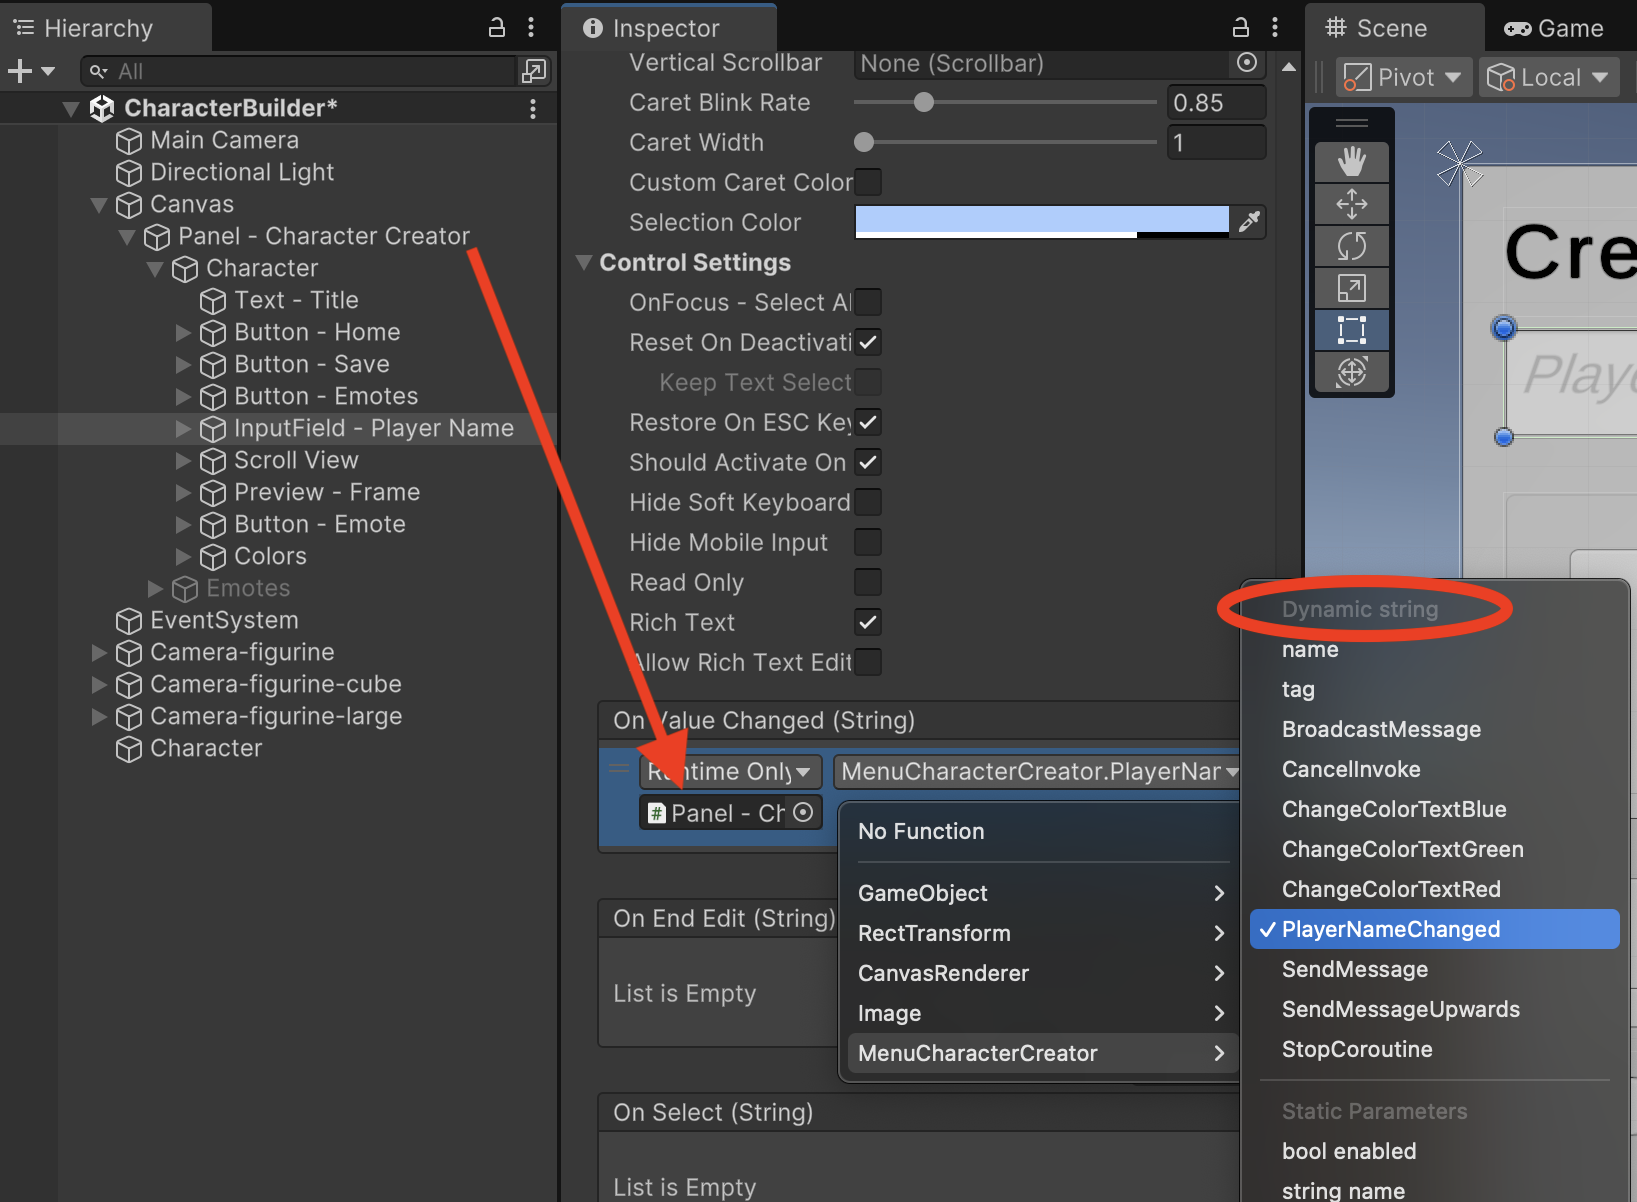
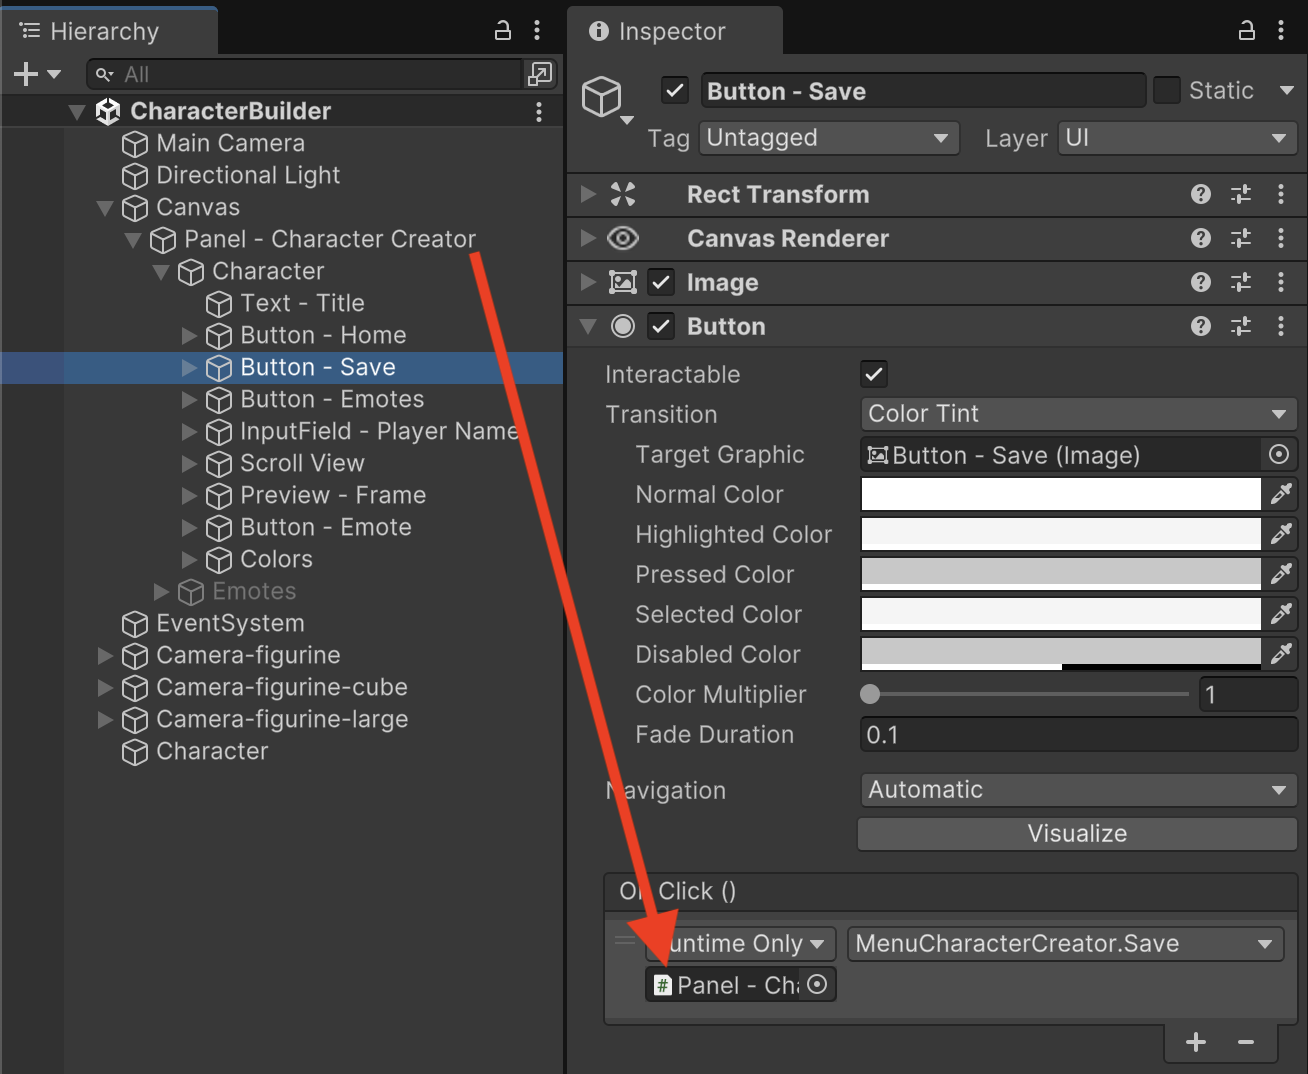
With all our Character save helper functions in place, we need UI button logic that will collect our emotes and trigger our save function.
MenuCharacterCreator.cs
public void Save() { character.emotes = menuEmoteBuilder.GetEmotes(); character.SaveToFile(); }
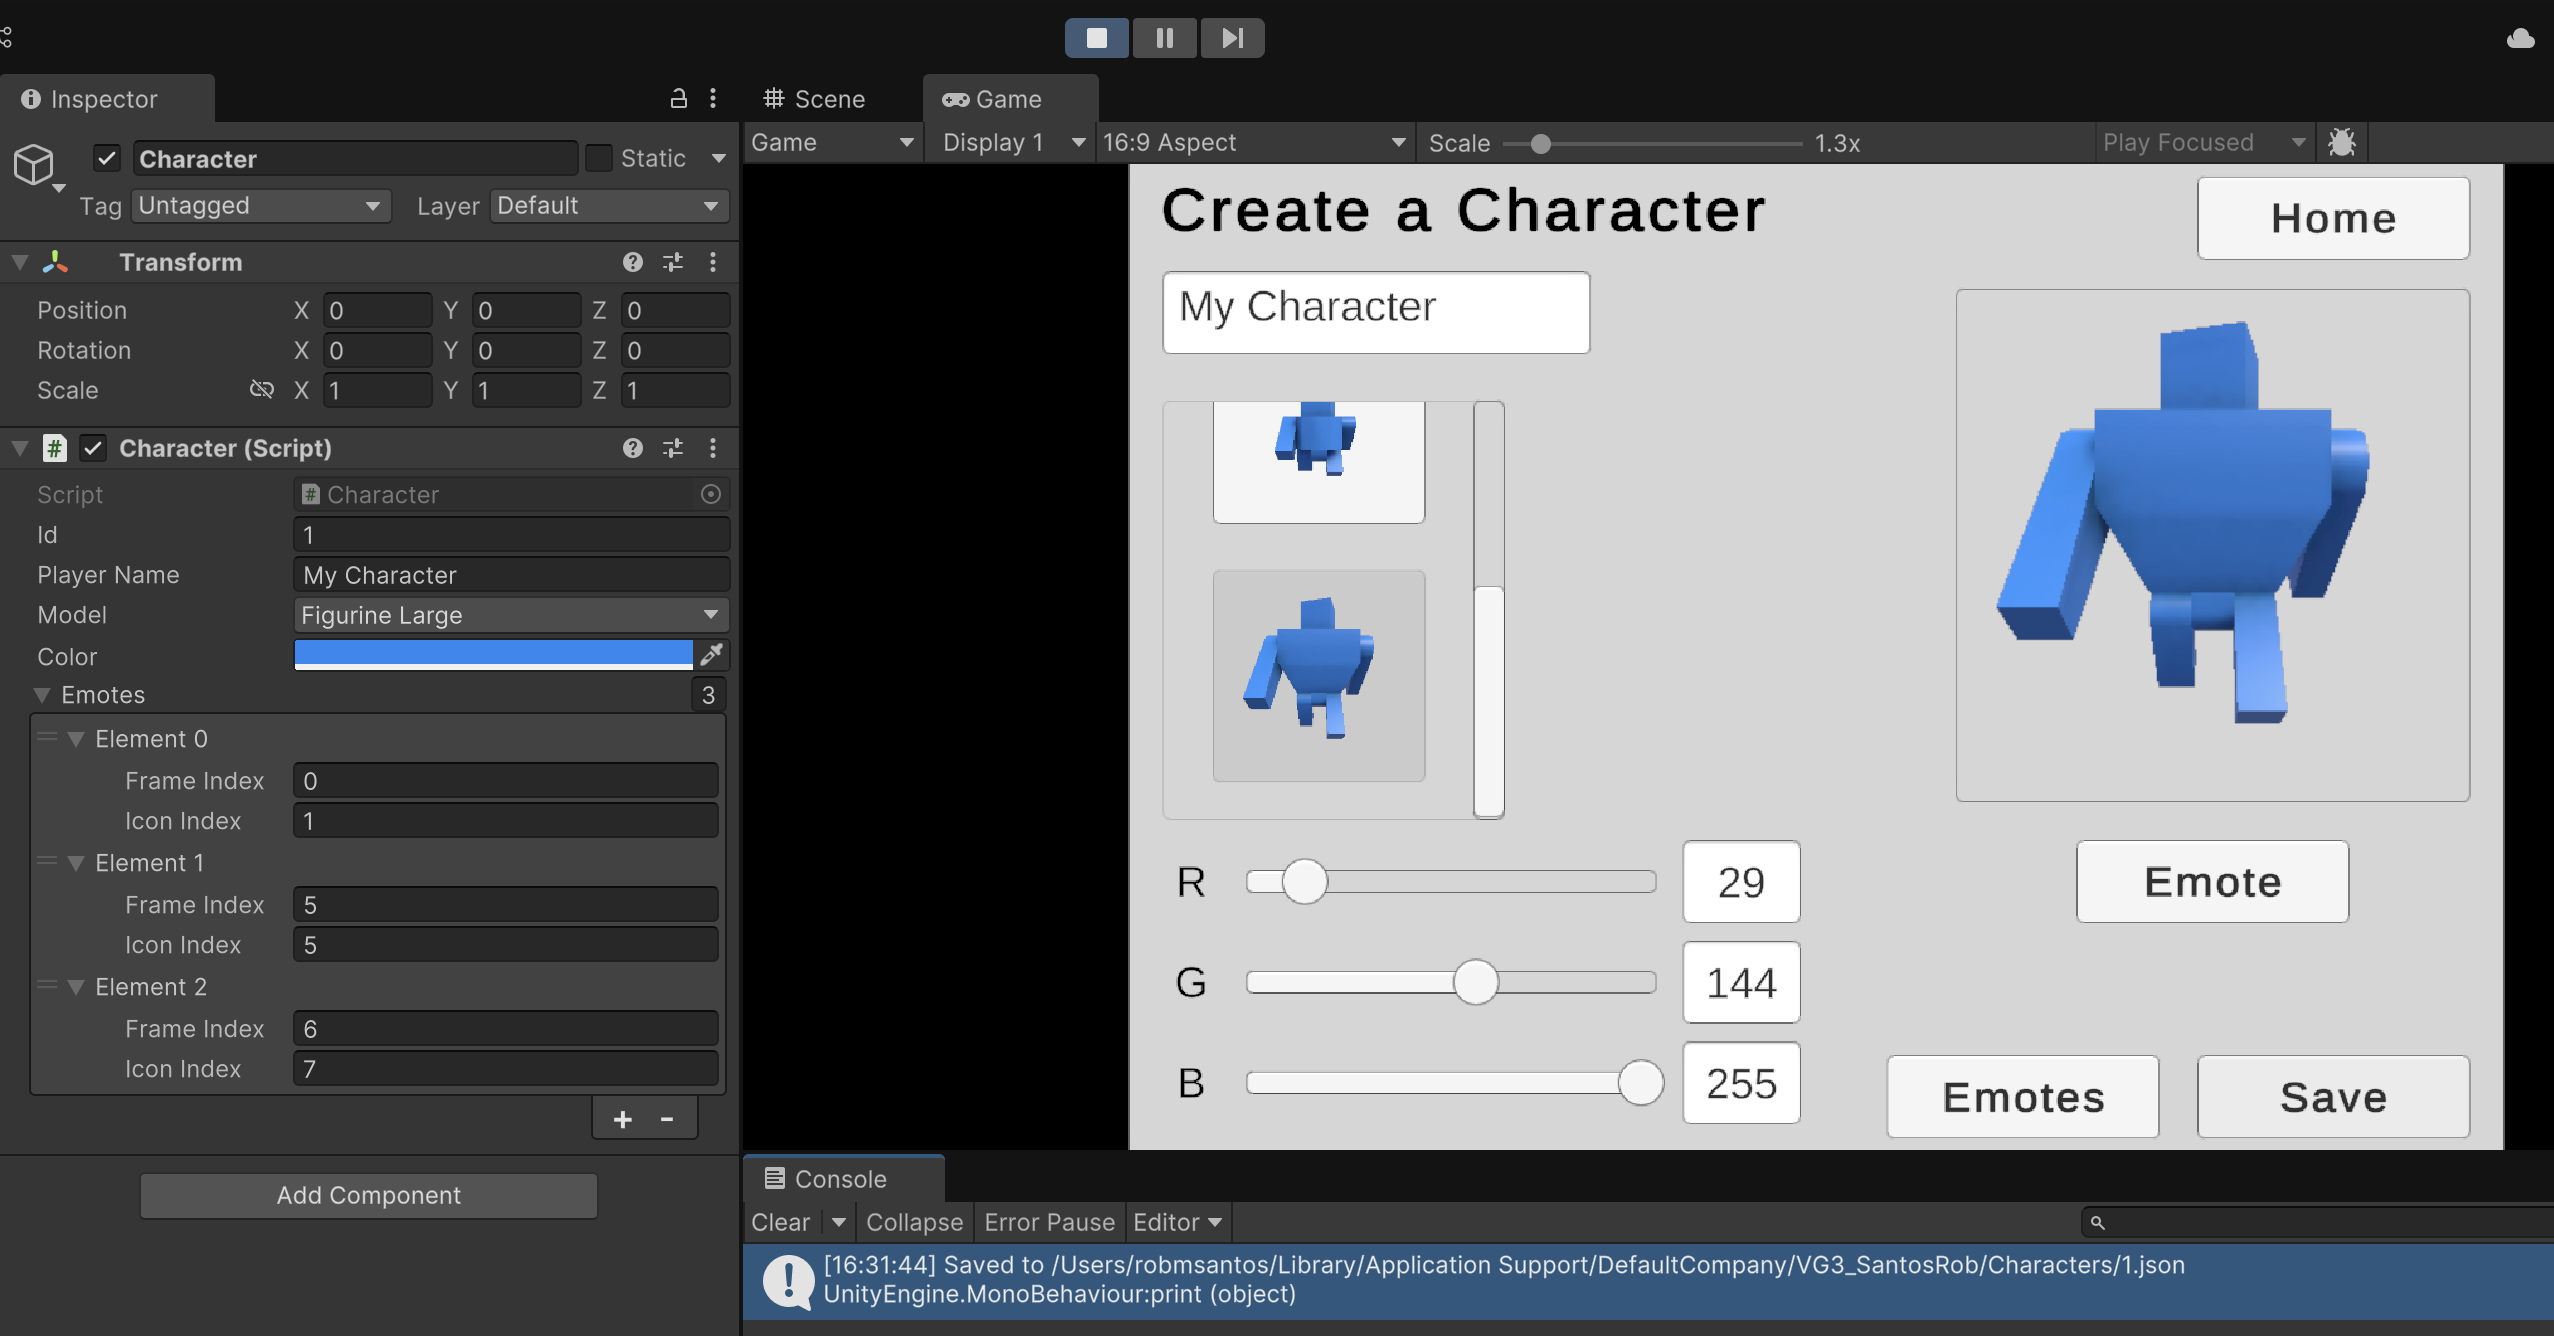
Let's double-check our work. (Be sure to uncomment the debugging code in Character.cs, Line 66 mentioned prior.) Start the game. Customize your character and don't forget to create a few emotes too. Return to the main character creator menu. Click the "Save" button.
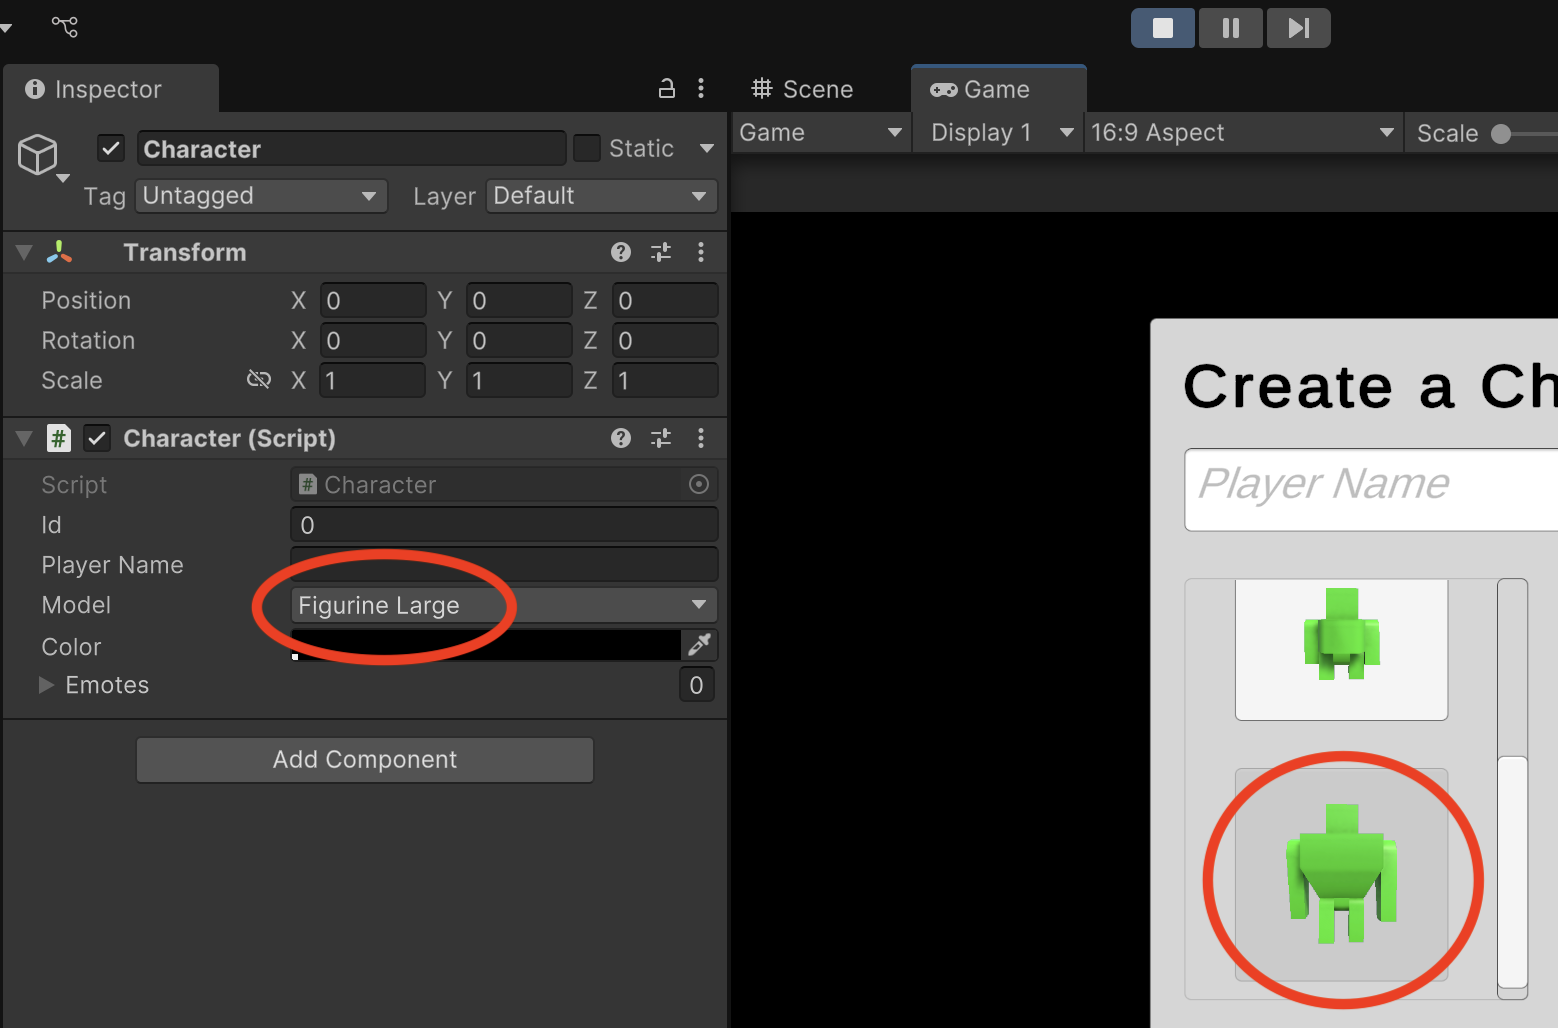
Upon clicking save, you should be able to inspect your Character gameObject and verify that all inspector fields have populated including Id and Emotes. The Console log should also tell you where to find your save file.
Locate the save file on your hard drive. (You may have to reveal hidden files as appropriate for your operating system.) Opening your save file should reveal JSON data, but it is probably difficult to read. We frequently save data without any spaces or formatting to avoid wasting storage.
1.json
{"id":1,"playerName":"My Character","model":2,"color":{"r":0.11372549086809159,"g":0.5647059082984924,"b":1.0,"a":1.0},"emotes":[{"frameIndex":0,"iconIndex":1},{"frameIndex":5,"iconIndex":5},{"frameIndex":6,"iconIndex":7}]}
You can reformat the JSON by hand following traditional code indentation rules to make the JSON easier to read. You might also have a text editor with the feature or use an online JSON formatter tool.
{ "id": 1, "playerName": "My Character", "model": 2, "color": { "r": 0.11372549086809158, "g": 0.5647059082984924, "b": 1, "a": 1 }, "emotes": [ { "frameIndex": 0, "iconIndex": 1 }, { "frameIndex": 5, "iconIndex": 5 }, { "frameIndex": 6, "iconIndex": 7 } ] }
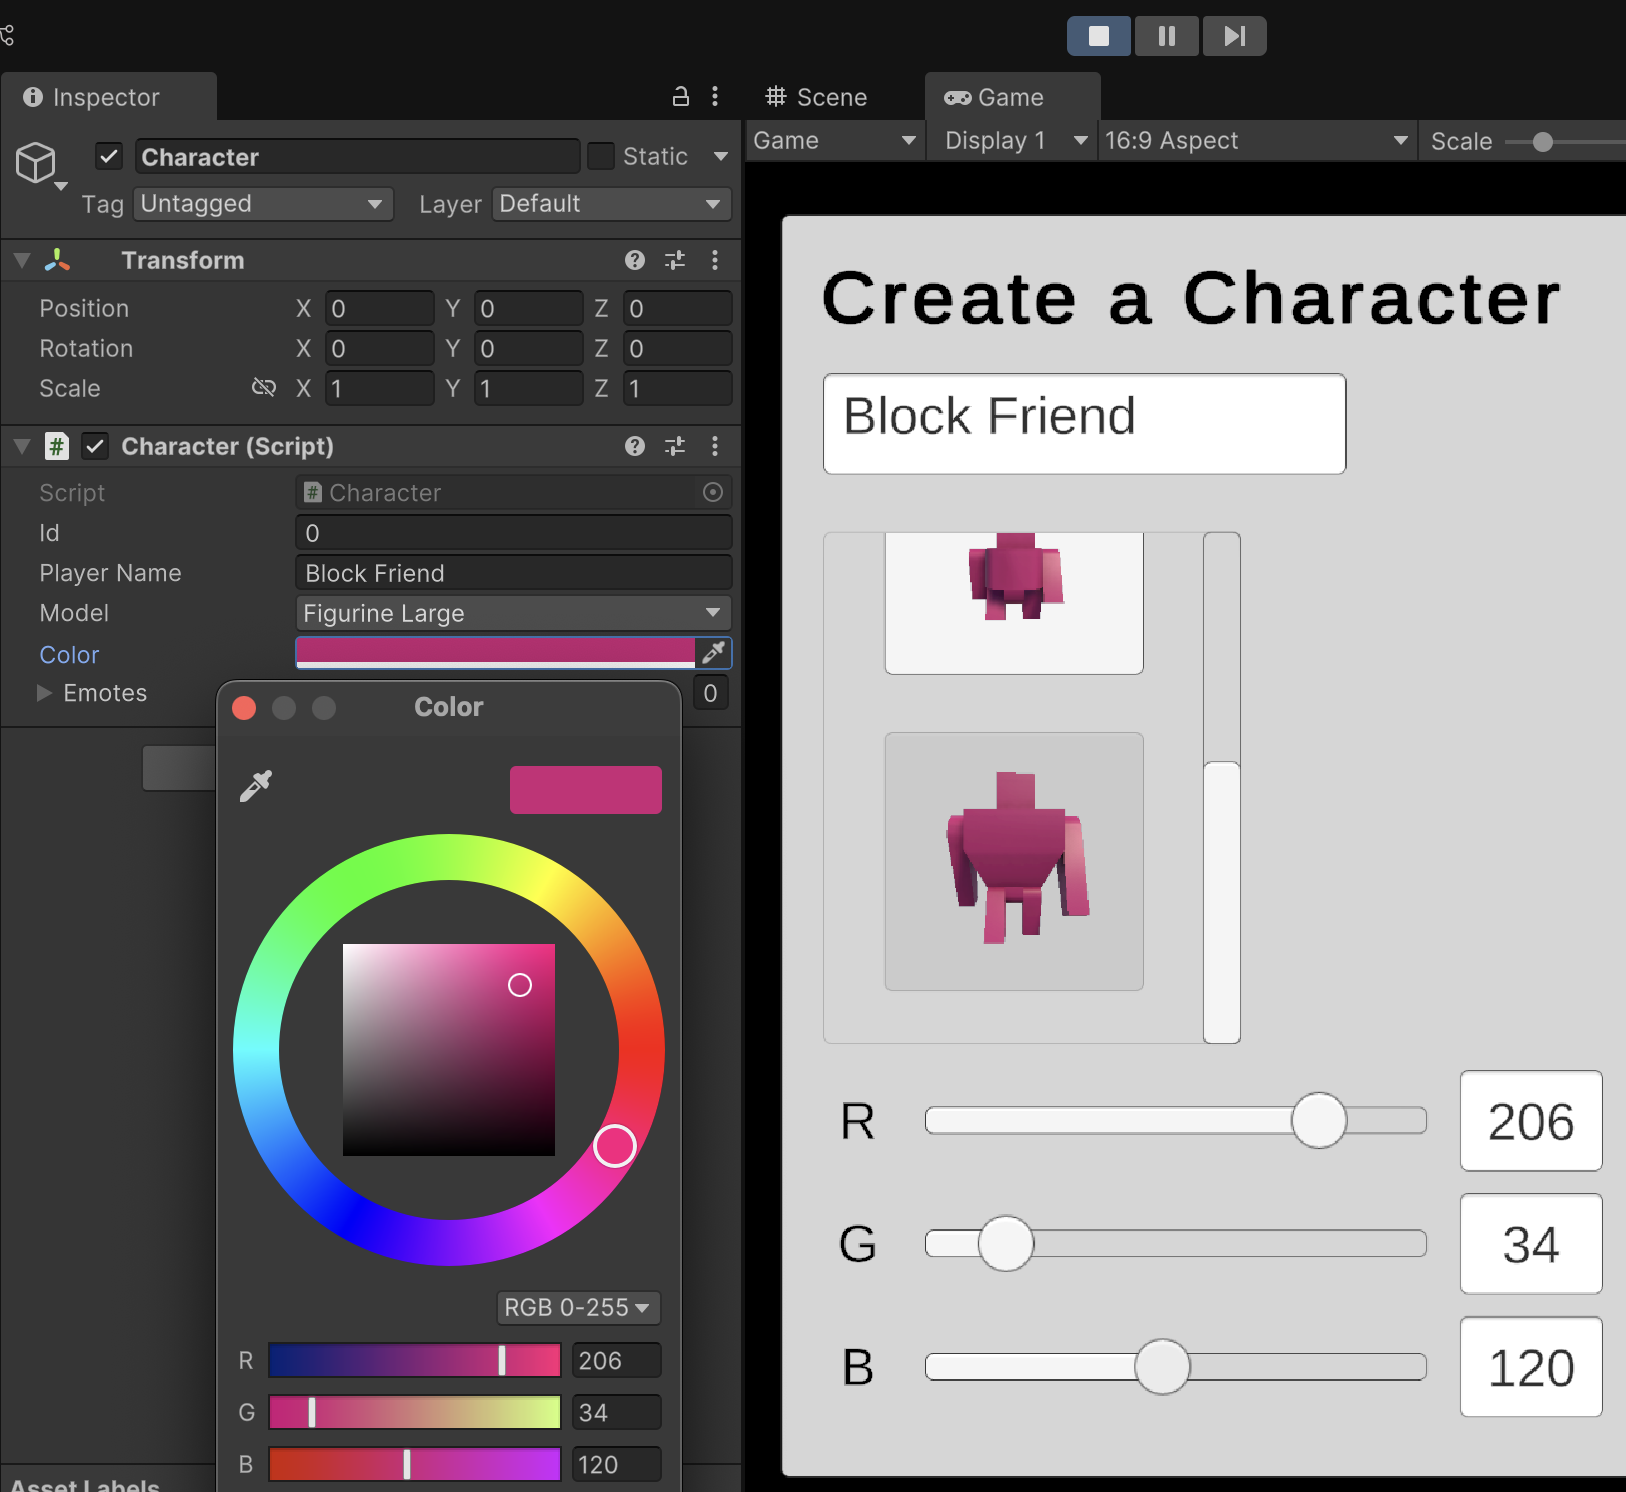
Compare your JSON data to the Character inspector values. They should all match. In the inspector, you will see the enum value name for the model, while the matching integer is used in JSON instead. Unity's inspector also portrays RGB color values ranging from 0 to 255, but in JSON, the values range from 0 to 1. You should still have equivalent values for all properties despite the different representations.
To avoid polluting your console with unnecessary messages, you should comment Character.cs, Line 66 again now that we are done debugging.
While we can confirm that our save data is persisting to the file system, restarting the game still resets us to a default character. In order to continue using our characters after the game restarts, we must also implement loading functionality which we will explore in the upcoming tutorial.
Play your scene and ensure that all your features and interactions perform as demonstrated throughout the tutorial.
SAVE any open files or scenes and close Unity to ensure any temp files are finalized.
Submit your assignment for grading following the instructions supplied for your particular classroom.